


How to Crear an Correo Electrónico Client Contraseña fo NiceNIC Correo Empresarial
Using Outlook, Apple Mail, Thunderbird, o Foxmail with tu/tus/su/sus NiceNIC Correo Empresarial? You can create a separate passwod fo tu/tus/su/sus email client.
In NiceNIC Webmail, this passwod is called a Client authoization code. Enter it in tu/tus/su/sus email client's nomal Contraseña field.
This guide walks you through two tasks:
- In NiceNIC Webmail: Crear y save tu/tus/su/sus email client passwod.
- In tu/tus/su/sus email client: Enter that passwod fo tu/tus/su/sus NiceNIC Correo Empresarial account.
Befoe You Start
Have tu/tus/su/sus full Correo Empresarial address y its current mailbox passwod ready. You will use these to sign in to Webmail. Your mailbox passwod may be different from tu/tus/su/sus NiceNIC website account passwod.
Please keep these points in mind:
- Your regular passwod remains the passwod you use to sign in to NiceNIC Webmail.
- Once you enable client authoization codes, tu/tus/su/sus email clients must use an authoization code instead of tu/tus/su/sus regular mailbox passwod.
- Si tu/tus/su/sus mailbox is already connected to other email clients o devices, you will also need to update their saved passwods.
Impotant: The generated code is displayed only once. Copy y save it befoe closing the ventana. Si you close the ventana without saving it, you will need to generate a new code.
Step 1: Abrir the Client Authoization Code Settings
- Abrir NiceNIC Webmail in tu/tus/su/sus browser.
- Iniciar Sesión with the full email address of the mailbox you want to connect y its current mailbox passwod.
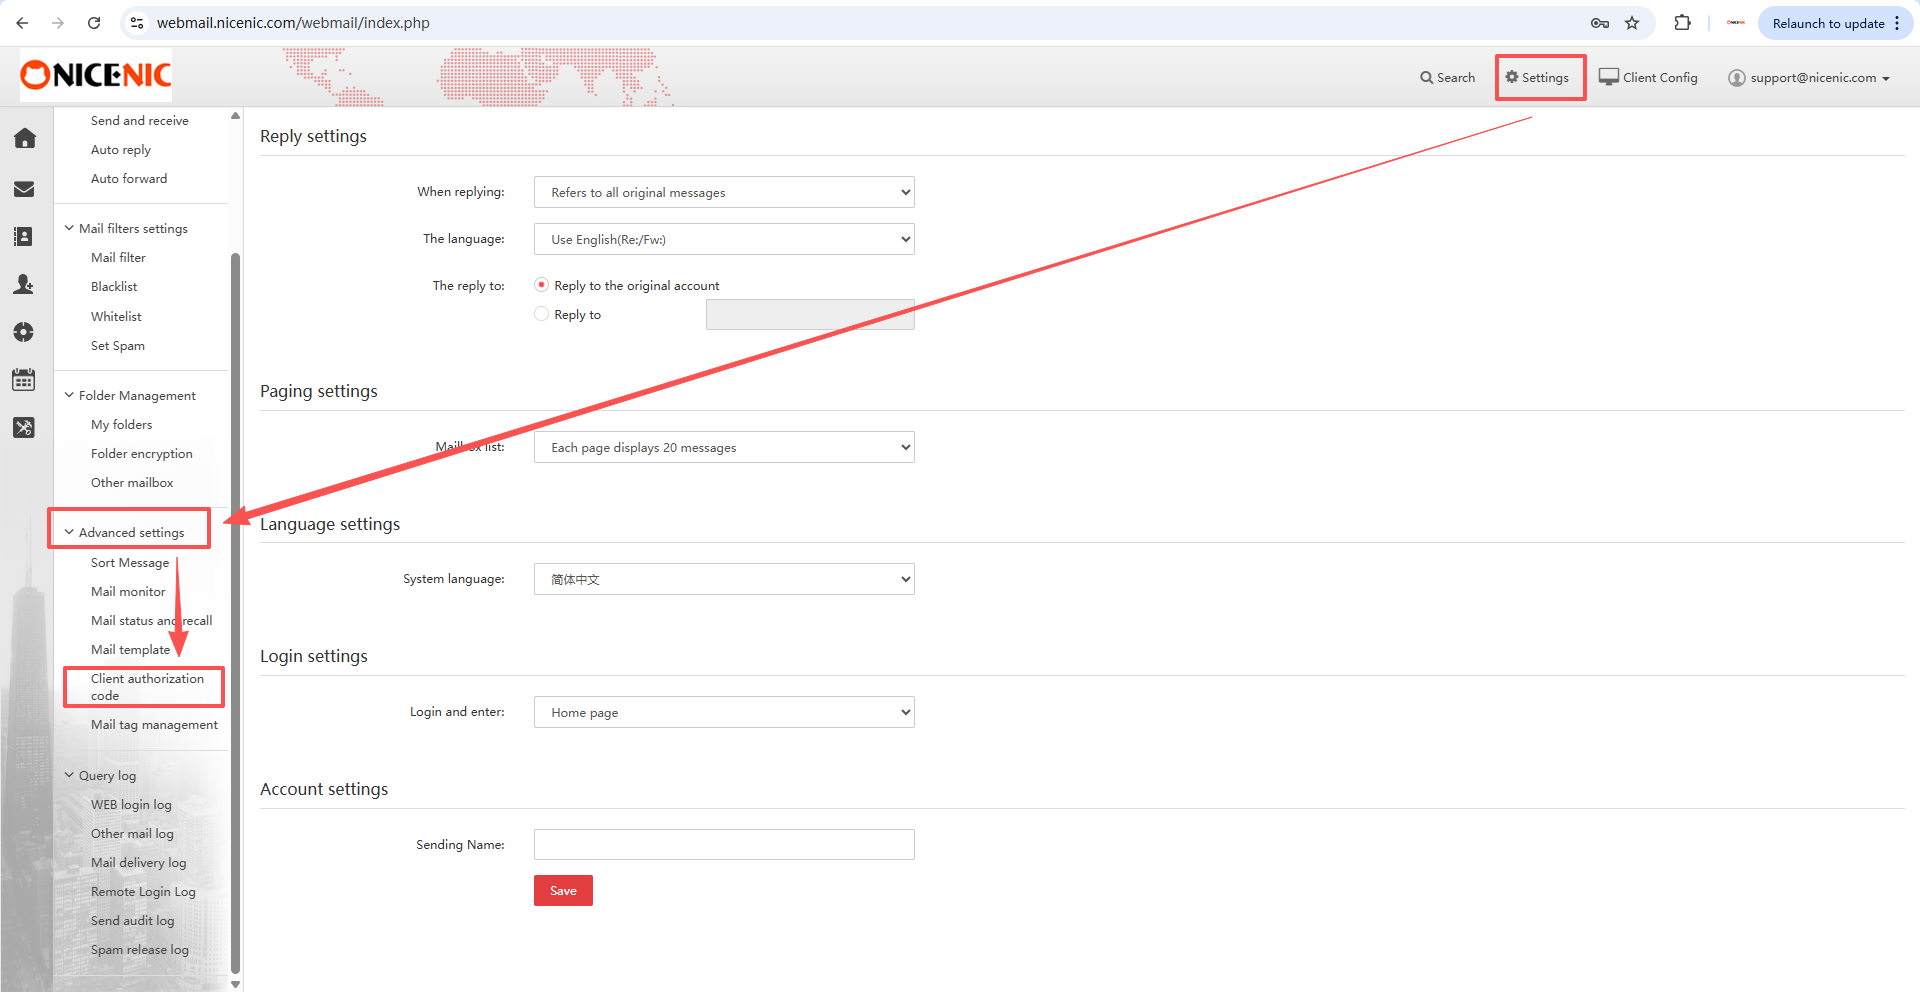
- Hacer clic Settings in the upper-right coner.
- Scroll down the menu on the left y expy Advanced settings.
- Hacer clic Client authoization code.
Fo example, if you want to use [email protected] in Outlook, sign in to Webmail with that email address. The account shown in the screenshots is an example.
Step 2: Enable Authoization Codes
On the Client authoization code page:
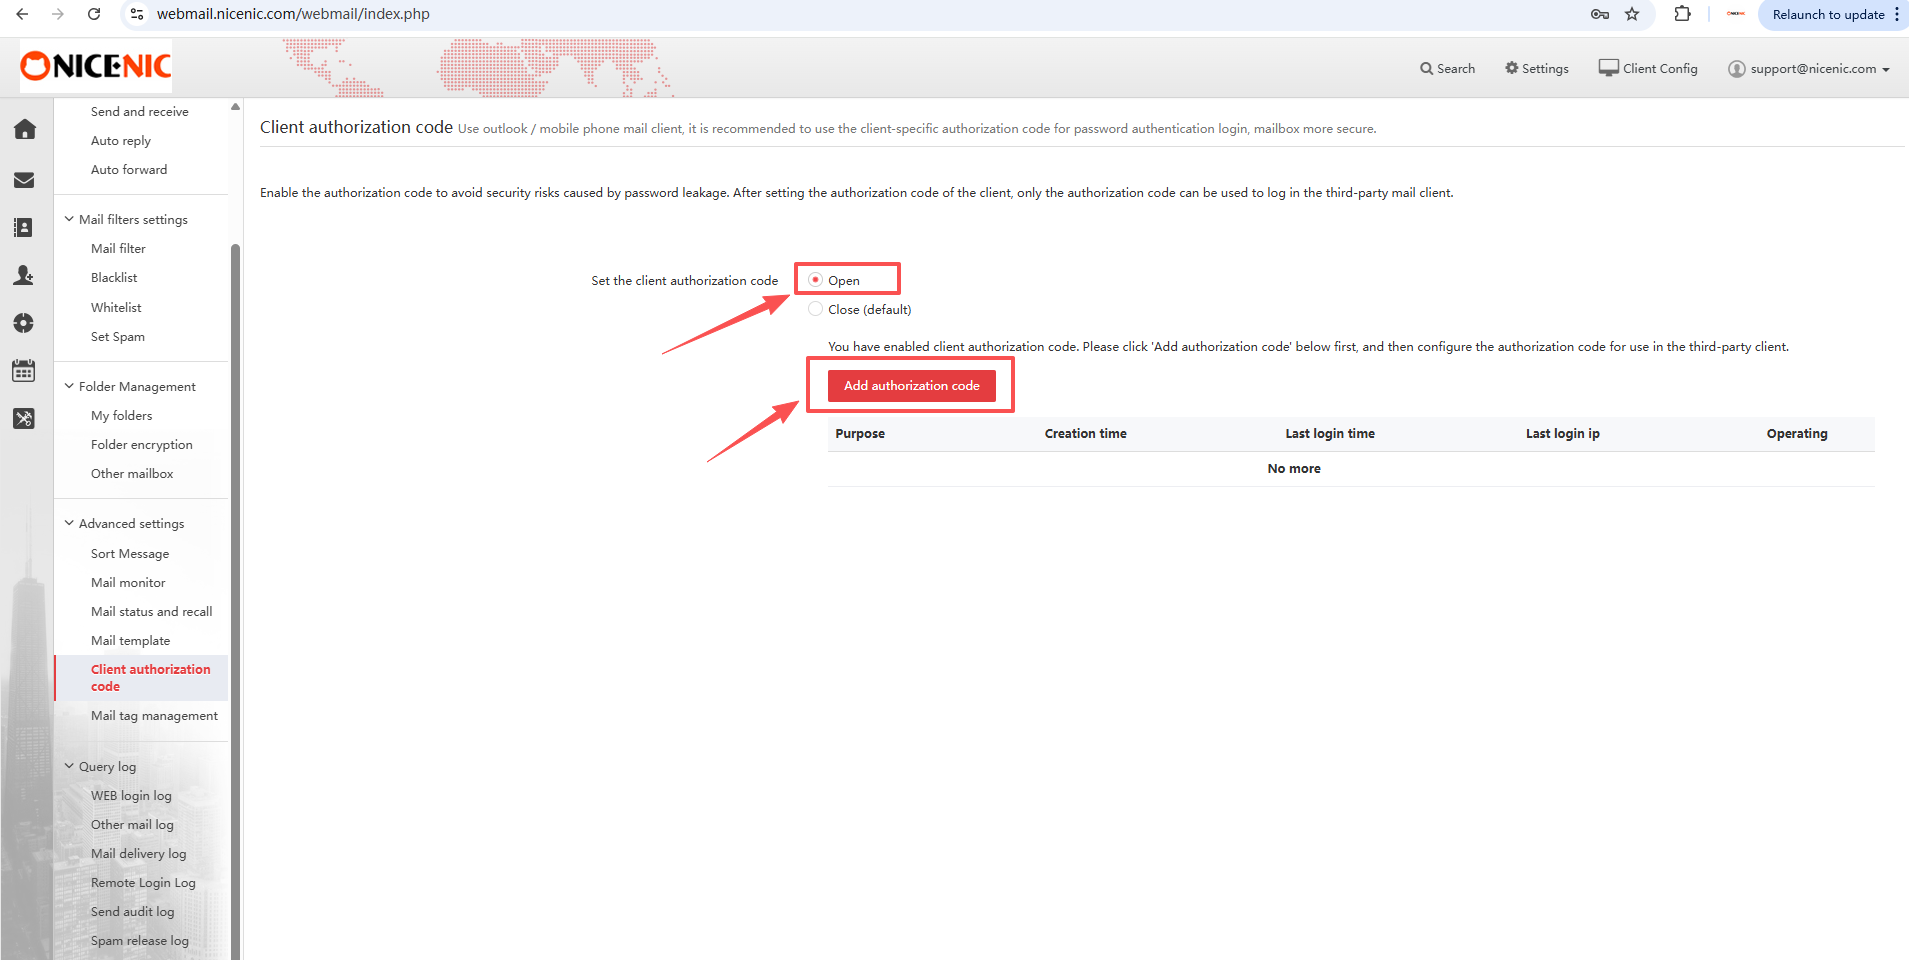
- Find Set the client authoization code.
- Select Abrir to enable the feature.
- Hacer clic the red Agregar authoization code button.
Si Abrir is already selected, click Agregar authoization code to create a new code.
After enabling this feature, continue with the following steps to create a code y update tu/tus/su/sus email client. An existing client may ask fo a passwod until you update it.
Step 3: Nombre y Generate Your Correo Electrónico Client Contraseña
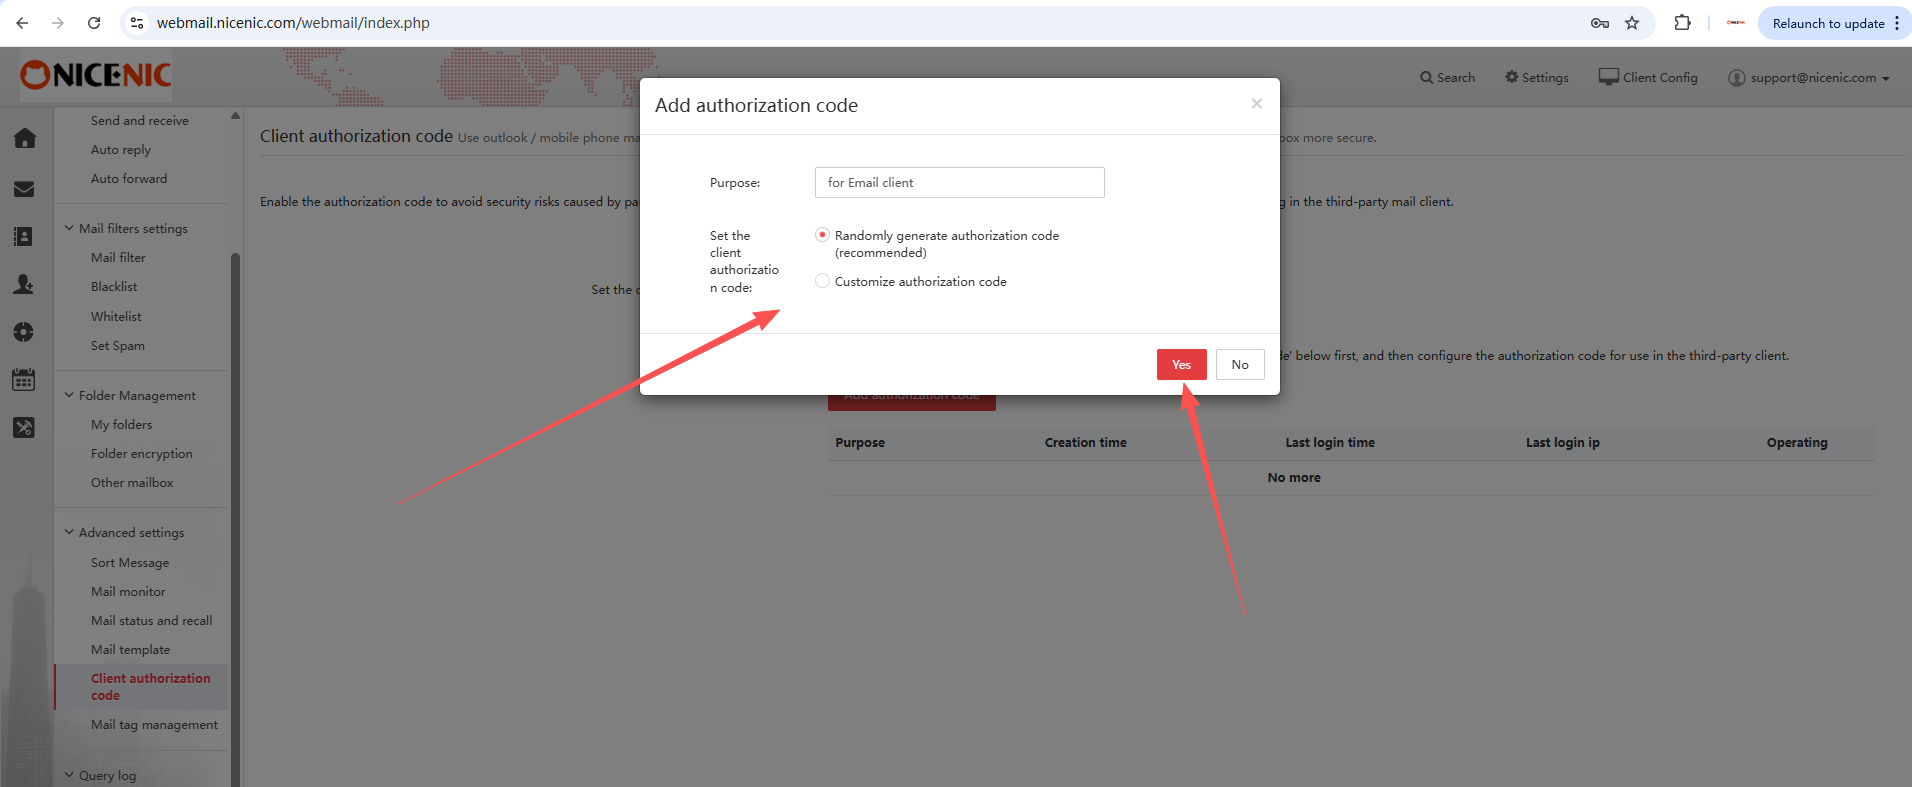
An Agregar authoization code ventana will appear.
- In Purpose, enter a name that helps you recognize waquí you will use the code. Ejemplos include Outlook Laptop, Apple Mail iPhone, o Foxmail Desktop.
- Leave Ryomly generate authoization code (recommended) selected.
- Hacer clic Sí to generate the code.
The Purpose field is only a label fo tu/tus/su/sus reference. It is not the passwod you will enter in tu/tus/su/sus email client.
The ventana also offers Customize authoization code. Fo this guide, use the recommended ryom generation option.
You can repeat these steps to create a separate code fo another email client o device. Give each code a clear name so you can identify it later.
Step 4: Copy y Save the Code Befoe Closing
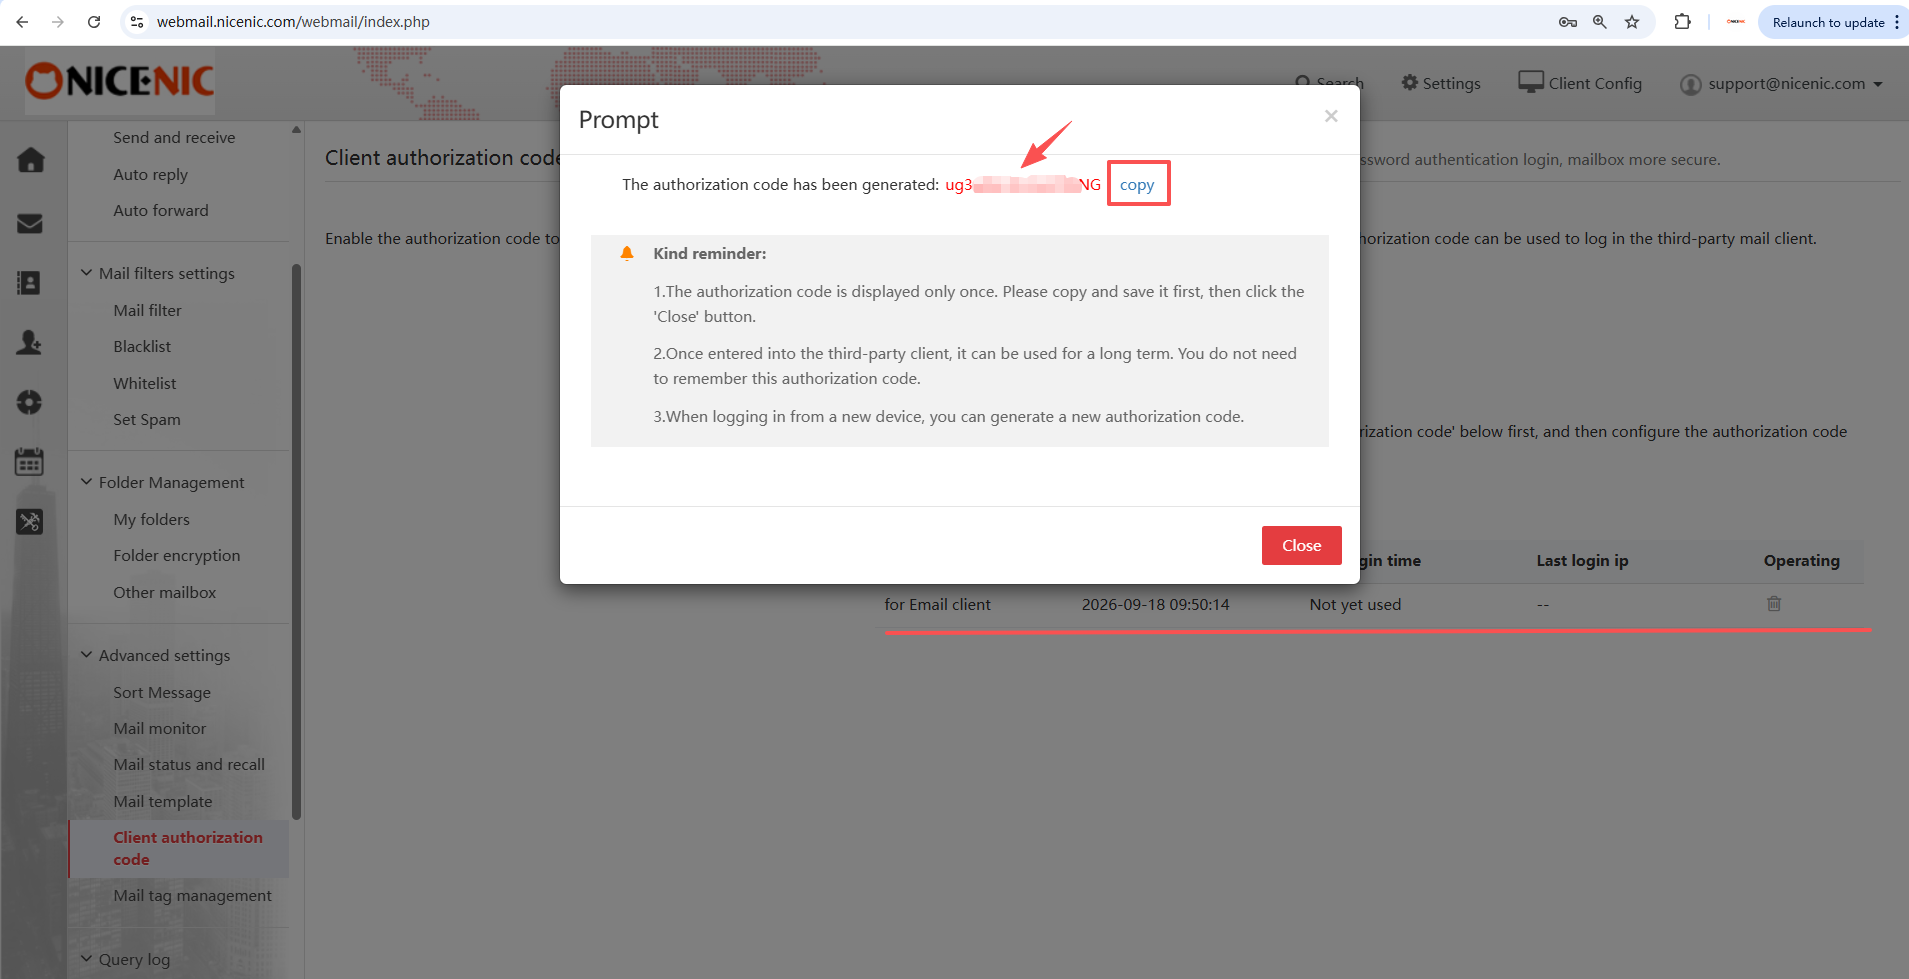
The siguiente ventana displays tu/tus/su/sus new authoization code.
Do not close this ventana until you have copied y saved the code. You cannot reopen it later to view the same code.
- Hacer clic copy siguiente to the generated code.
- Paste the code into a secure place, such as a passwod manager. Save it with the email address y the client o device name.
- Verificar that the complete code has been saved.
- Hacer clic Cerrar only after you have finished.
Hacer clicing copy puts the code on tu/tus/su/sus clipboard; it does not save it permanently. Copying something else may replace it.
Already closed the ventana without saving? Volver to Client authoization code, click Agregar authoization code, y generate a new one.
Step 5: Enter the Contraseña in Your Correo Electrónico Client
Now open Outlook, Apple Mail, Thunderbird, Foxmail, o the email client you want to use.
Si you are adding tu/tus/su/sus mailbox fo the first time:
Start the email client's Agregar account process. When asked fo tu/tus/su/sus account details, enter:
-
Dirección de correo electrónico / Nombre de usuario: Your full NiceNIC Correo Empresarial address, such as
[email protected]. - Contraseña: The authoization code you generated in Step 3.
Si tu/tus/su/sus mailbox is already added:
Abrir the settings fo that email account y replace its saved passwod with the new authoization code. Si the client displays a passwod prompt, enter the authoization code taquí .
Use the nomal Contraseña field. You do not need to find a separate field called "Client authoization code."
Some clients have separate passwod settings fo incoming mail y outgoing mail:
- Incoming mail (IMAP o POP): Enter the authoization code.
- Outgoing mail (SMTP): Enter the same authoization code fo that account in that client.
Si the client asks fo server addresses, pots, o connection settings, open Client Config at the top of NiceNIC Webmail y use the settings shown fo tu/tus/su/sus mailbox.
Save tu/tus/su/sus changes. Then send a test message to another email address y reply to it to check that both sending y receiving wok.
Preguntas Frecuentes
I closed the ventana befoe saving the code. How do I get it back?
The generated code is displayed only once y cannot be viewed again after you close the ventana.
Iniciar Sesión to NiceNIC Webmail, go to Settings → Advanced settings → Client authoization code, y click Agregar authoization code. Generate a new code, save it, y enter it in tu/tus/su/sus email client.
Is this a one-time passwod that I must replace every time I sign in?
No.
Need an email address fo tu/tus/su/sus business? Obtener email using tu/tus/su/sus own dominio, such as [email protected].
Obtener NiceNIC Correo Empresarial →


