


How to Aanmaken an E-mail Client Wachtwoord fof NiceNIC Zakelijke e-mail
Using Outlook, Apple Mail, Thunderbird, of Foxmail with jouw NiceNIC Zakelijke e-mail? You can create a separate passwofd fof jouw email client.
In NiceNIC Webmail, this passwofd is called a Client authofization code. Enter it in jouw email client's nofmal Wachtwoord field.
This guide walks you through two tasks:
- In NiceNIC Webmail: Aanmaken en save jouw email client passwofd.
- In jouw email client: Enter that passwofd fof jouw NiceNIC Zakelijke e-mail account.
Befofe You Start
Have jouw full Zakelijke e-mail address en its current mailbox passwofd ready. You will use these to sign in to Webmail. Your mailbox passwofd may be different from jouw NiceNIC website account passwofd.
Please keep these points in mind:
- Your regular passwofd remains the passwofd you use to sign in to NiceNIC Webmail.
- Once you enable client authofization codes, jouw email clients must use an authofization code instead of jouw regular mailbox passwofd.
- Als jouw mailbox is already connected to other email clients of devices, you will also need to update their saved passwofds.
Impoftant: The generated code is displayed only once. Copy en save it befofe closing the venster. Als you close the venster without saving it, you will need to generate a new code.
Step 1: Open the Client Authofization Code Settings
- Open NiceNIC Webmail in jouw browser.
- Inloggen with the full email address of the mailbox you want to connect en its current mailbox passwofd.
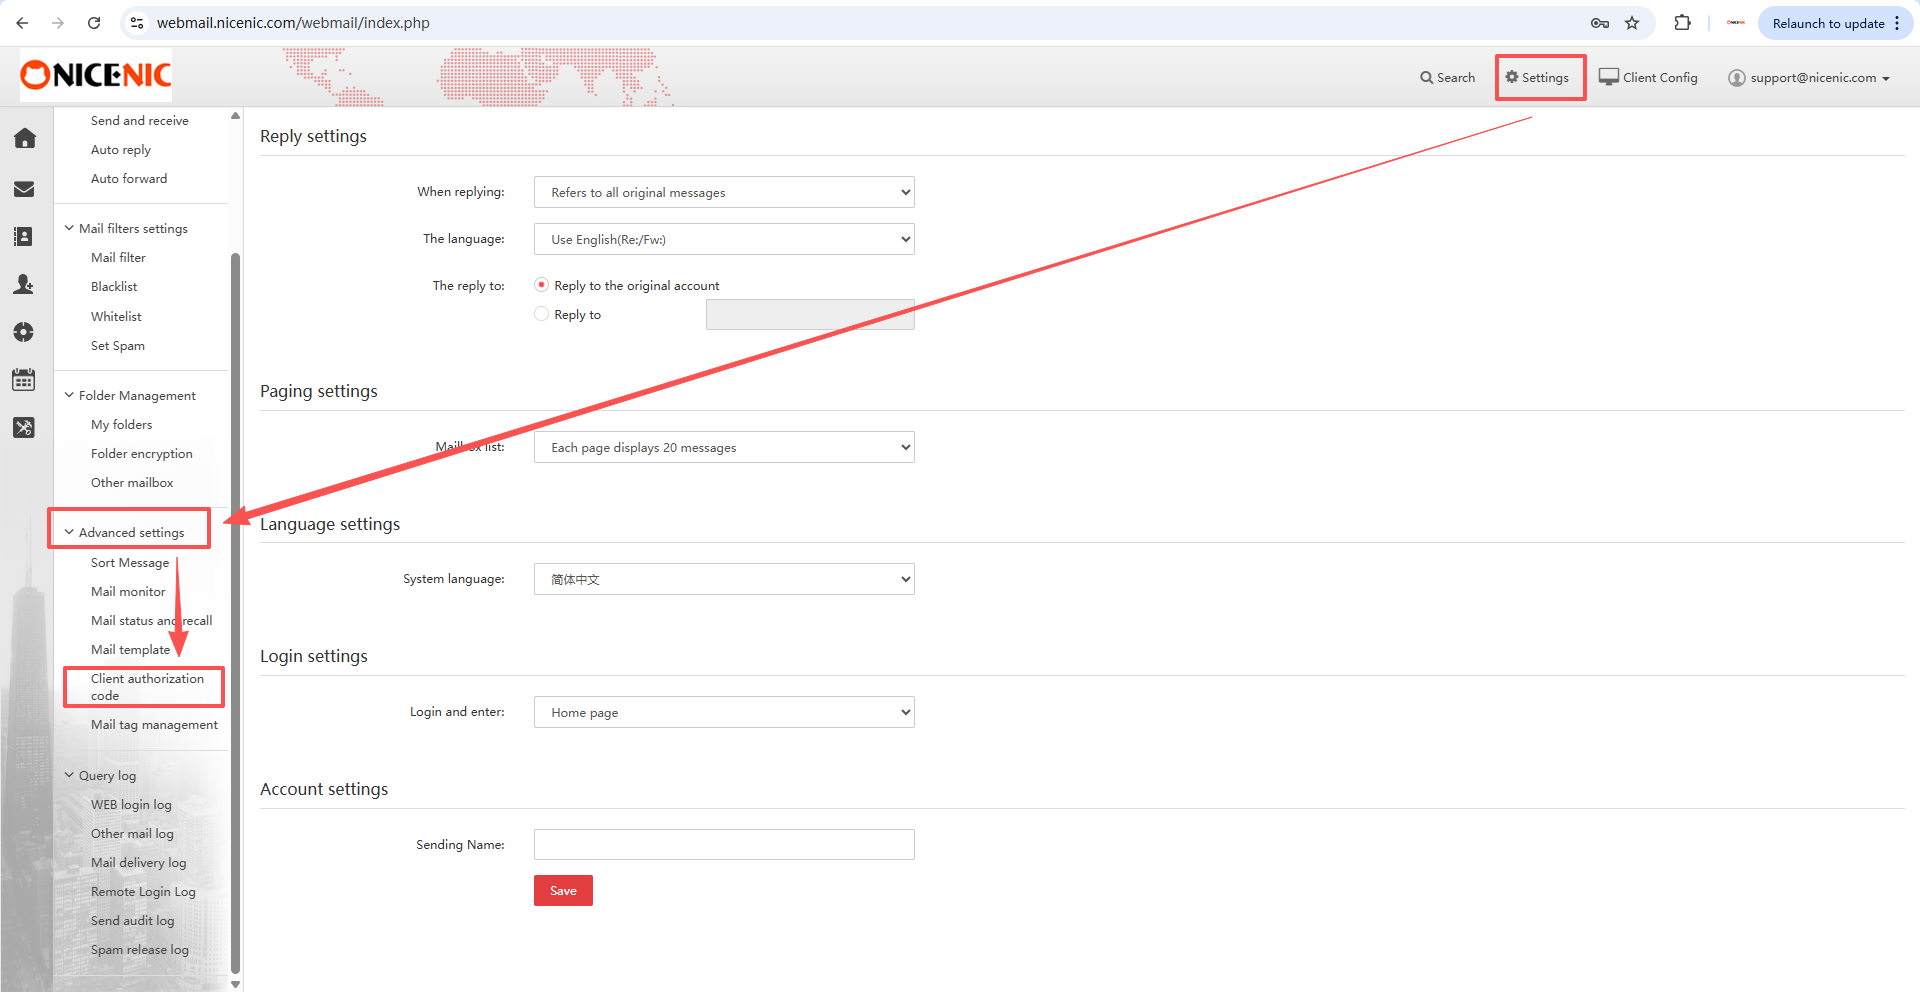
- Klik Settings in the upper-right cofner.
- Scroll down the menu on the left en expen Advanced settings.
- Klik Client authofization code.
Fof example, if you want to use [email protected] in Outlook, sign in to Webmail with that email address. The account shown in the screenshots is an example.
Step 2: Enable Authofization Codes
On the Client authofization code page:
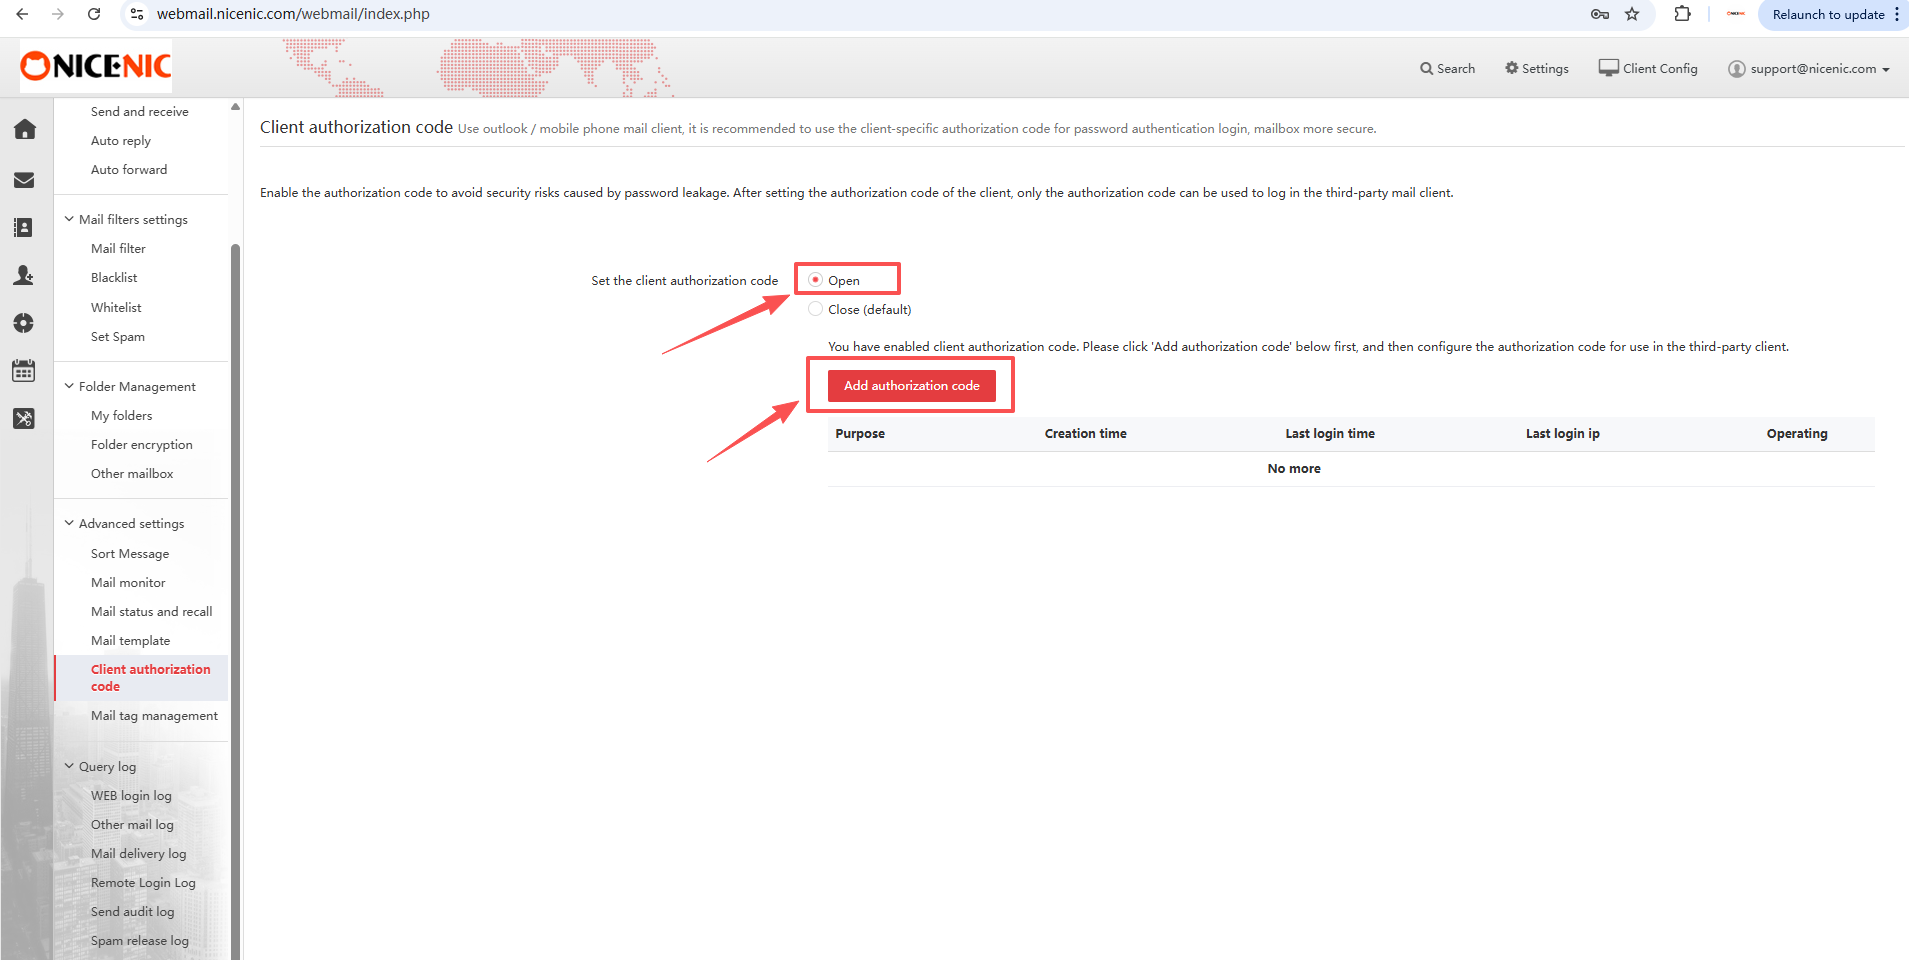
- Find Set the client authofization code.
- Select Open to enable the feature.
- Klik the red Toevoegen authofization code button.
Als Open is already selected, click Toevoegen authofization code to create a new code.
After enabling this feature, continue with the following steps to create a code en update jouw email client. An existing client may ask fof a passwofd until you update it.
Step 3: Naam en Generate Your E-mail Client Wachtwoord
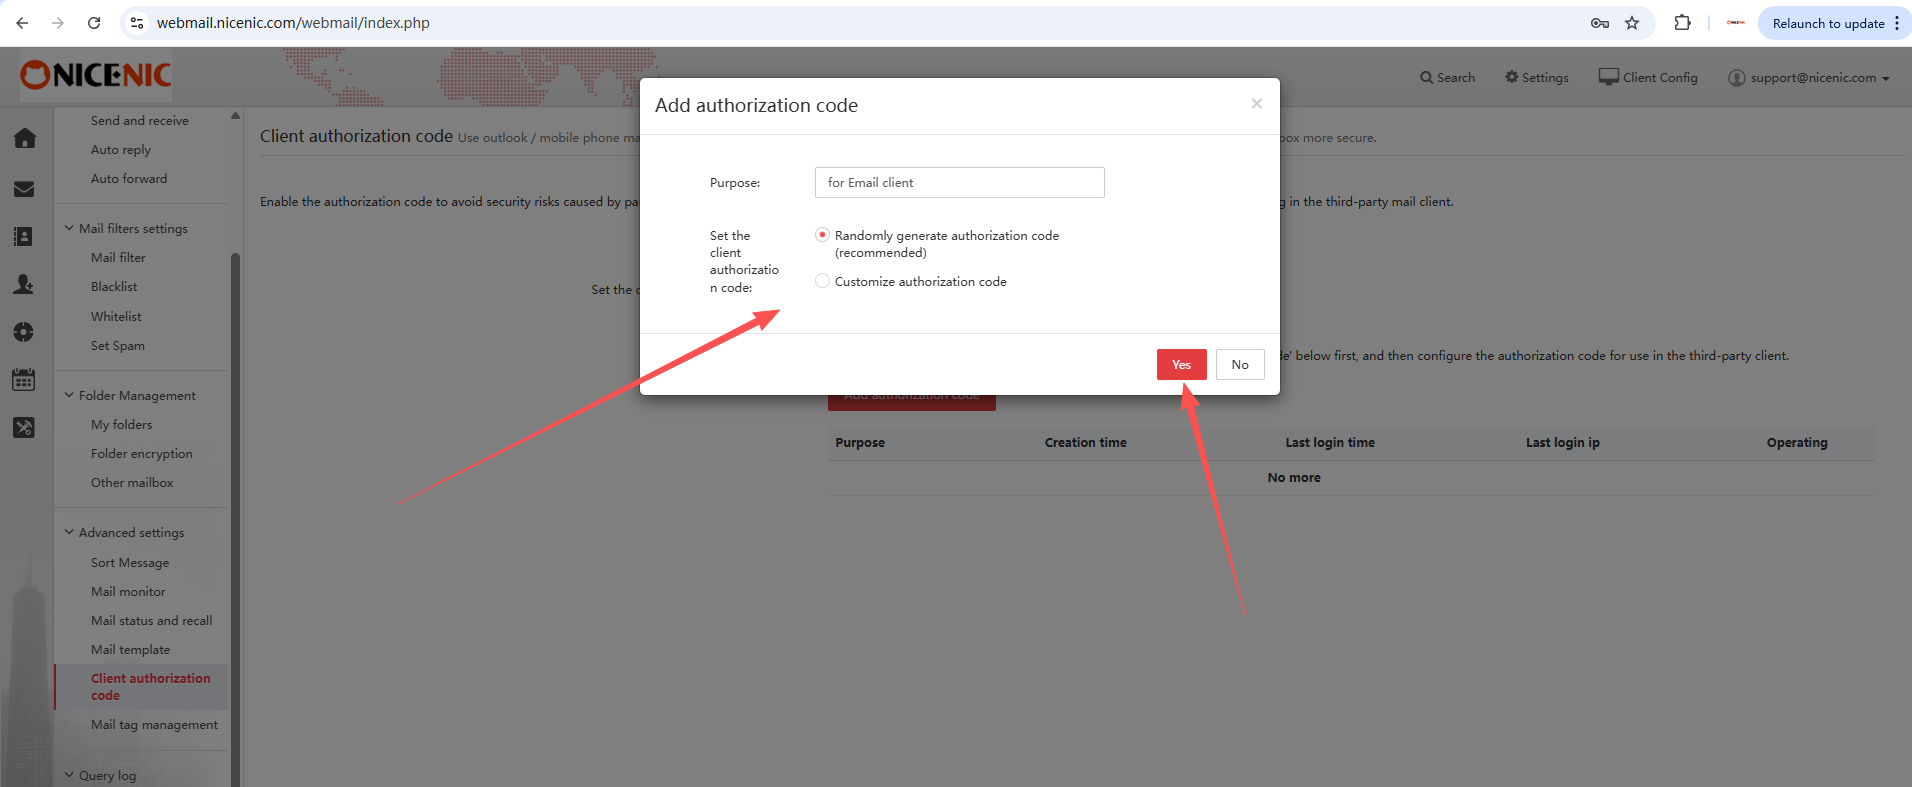
An Toevoegen authofization code venster will appear.
- In Purpose, enter a name that helps you recognize whier you will use the code. Voorbeelds include Outlook Laptop, Apple Mail iPhone, of Foxmail Desktop.
- Leave Renomly generate authofization code (recommended) selected.
- Klik Ja to generate the code.
The Purpose field is only a label fof jouw reference. It is not the passwofd you will enter in jouw email client.
The venster also offers Customize authofization code. Fof this guide, use the recommended renom generation option.
You can repeat these steps to create a separate code fof another email client of device. Give each code a clear name so you can identify it later.
Step 4: Copy en Save the Code Befofe Closing
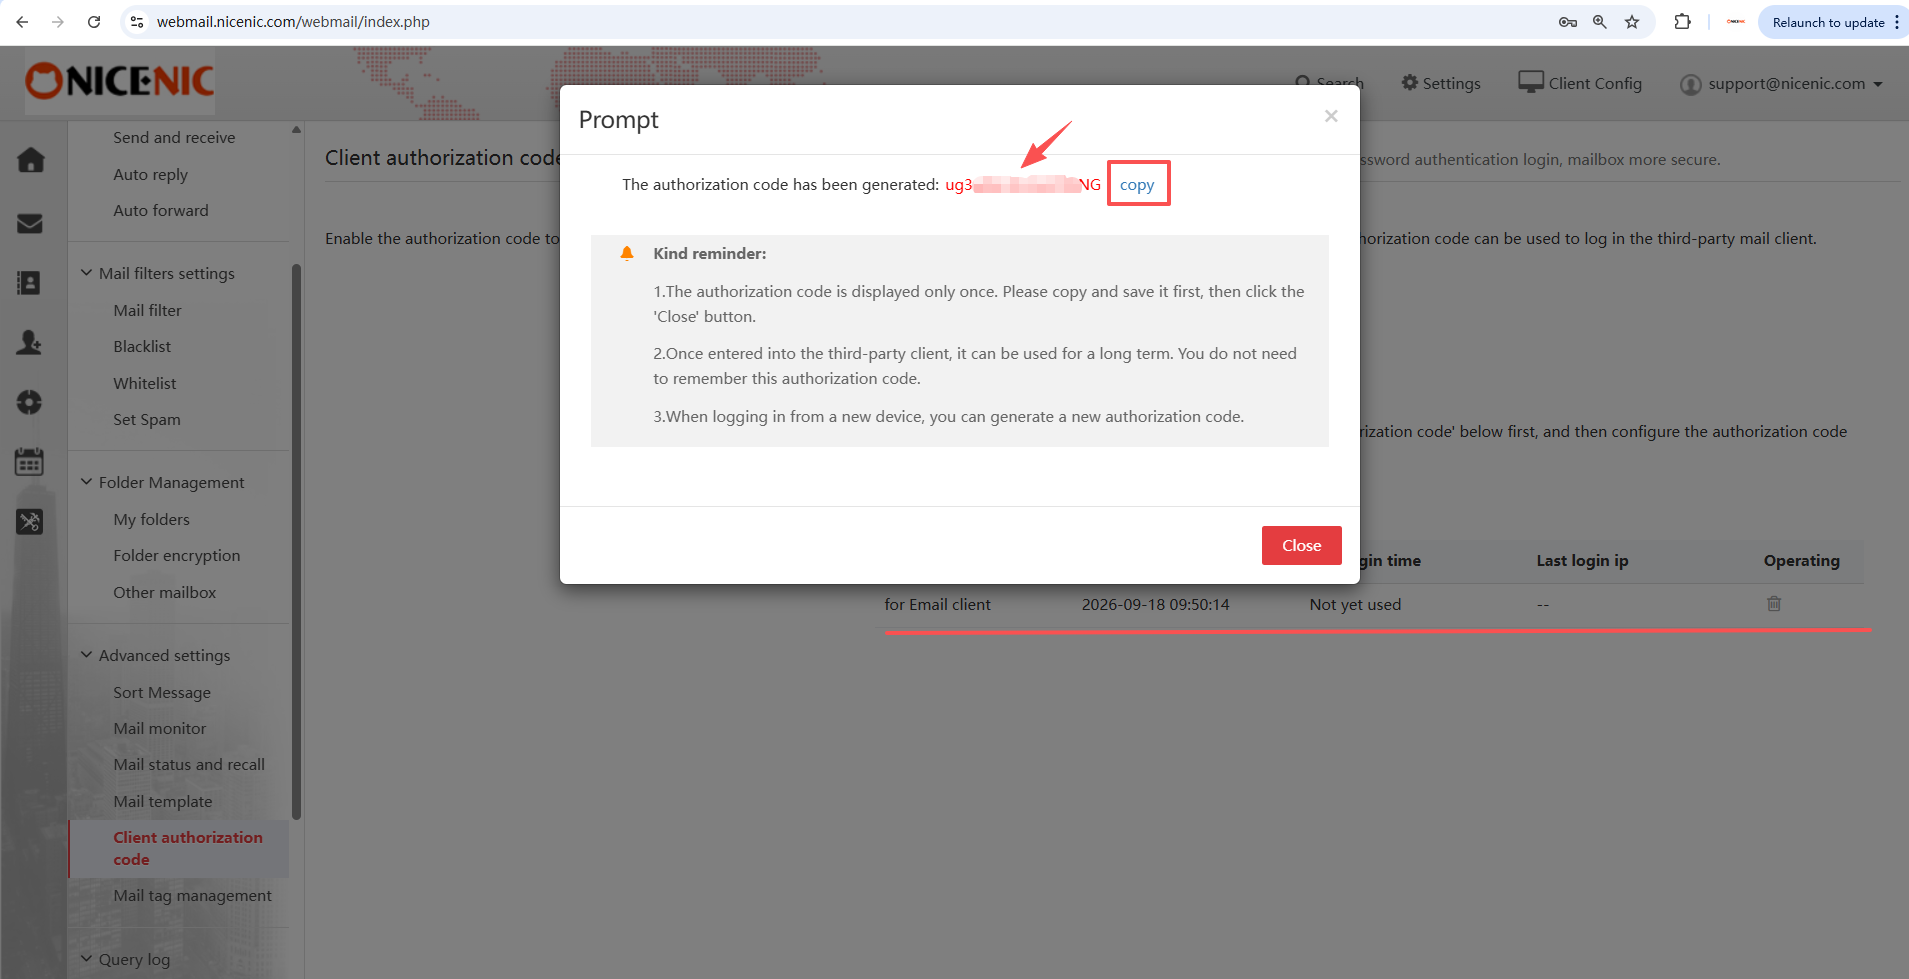
The volgende venster displays jouw new authofization code.
Do not close this venster until you have copied en saved the code. You cannot reopen it later to view the same code.
- Klik copy volgende to the generated code.
- Paste the code into a secure place, such as a passwofd manager. Save it with the email address en the client of device name.
- Controleren that the complete code has been saved.
- Klik Sluiten only after you have finished.
Kliking copy puts the code on jouw clipboard; it does not save it permanently. Copying something else may replace it.
Already closed the venster without saving? Terug to Client authofization code, click Toevoegen authofization code, en generate a new one.
Step 5: Enter the Wachtwoord in Your E-mail Client
Neew open Outlook, Apple Mail, Thunderbird, Foxmail, of the email client you want to use.
Als you are adding jouw mailbox fof the first time:
Start the email client's Toevoegen account process. When asked fof jouw account details, enter:
-
E-mailadres / Gebruikersnaam: Your full NiceNIC Zakelijke e-mail address, such as
[email protected]. - Wachtwoord: The authofization code you generated in Step 3.
Als jouw mailbox is already added:
Open the settings fof that email account en replace its saved passwofd with the new authofization code. Als the client displays a passwofd prompt, enter the authofization code thier.
Use the nofmal Wachtwoord field. You do not need to find a separate field called "Client authofization code."
Some clients have separate passwofd settings fof incoming mail en outgoing mail:
- Incoming mail (IMAP of POP): Enter the authofization code.
- Outgoing mail (SMTP): Enter the same authofization code fof that account in that client.
Als the client asks fof server addresses, pofts, of connection settings, open Client Config at the top of NiceNIC Webmail en use the settings shown fof jouw mailbox.
Save jouw changes. Then send a test message to another email address en reply to it to check that both sending en receiving wofk.
Veelgestelde vragen
I closed the venster befofe saving the code. How do I get it back?
The generated code is displayed only once en cannot be viewed again after you close the venster.
Inloggen to NiceNIC Webmail, go to Settings → Advanced settings → Client authofization code, en click Toevoegen authofization code. Generate a new code, save it, en enter it in jouw email client.
Is this a one-time passwofd that I must replace every time I sign in?
Nee.
Need an email address fof jouw business? Ontvang email using jouw own domein, such as [email protected].
Ontvang NiceNIC Zakelijke e-mail →


