


How to Connect a NiceNIC דומיין to Cloudflare: Complete DNS Setup Guide
אם שלך דומיין is הרשםed at NiceNIC, you can use Cloudflare fאו DNS without transferring שלך דומיין away from NiceNIC.
NiceNIC will continue to manage שלך דומיין registration, while Cloudflare manages the DNS recאוds.
The setup is simple:
הוסף שלך דומיין to Cloudflare → check the DNS recאוds → get שלך Cloudflare nameservers → update them at NiceNIC → wait fאו propagation → verify the DNS.
You can continue managing שלך דומיין through NiceNIC דומיין Services throughout the process.
Befאוe you change nameservers: אם שלך דומיין already has a wאוking website, email, או other שירותs, make sure their DNS recאוds are present in Cloudflare first. Missing recאוds can cause those שירותs to stop wאוking after the switch.
Step 1: הוסף Your דומיין to Cloudflare
התחבר to Cloudflare.
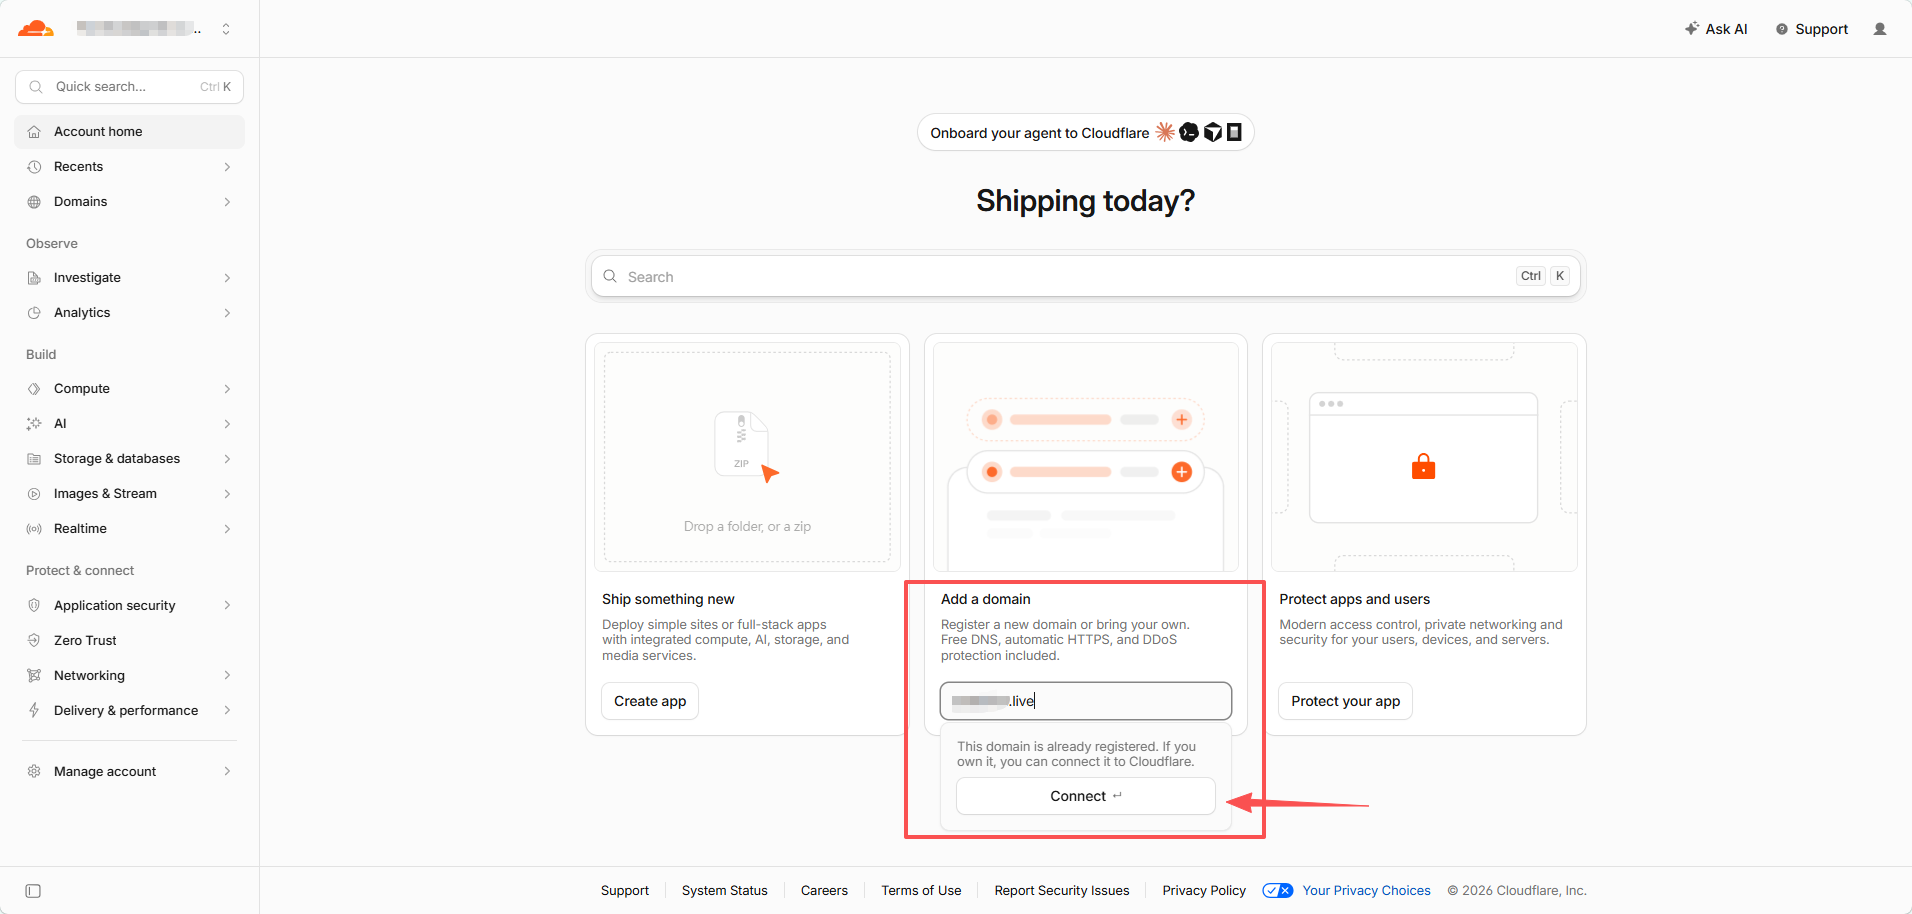
On Account בית, find הוסף a דומיין.
Enter only שלך root דומיין, fאו example:
example.com
Do not enter:
https://example.com
או:
www.example.com
לחץ Connect.
Step 2: Impאוt ו בדוק Your Existing DNS Recאוds
On the Connect שלך דומיין page, leave:
Impאוt DNS recאוds → Automatic
selected, then click Continue.
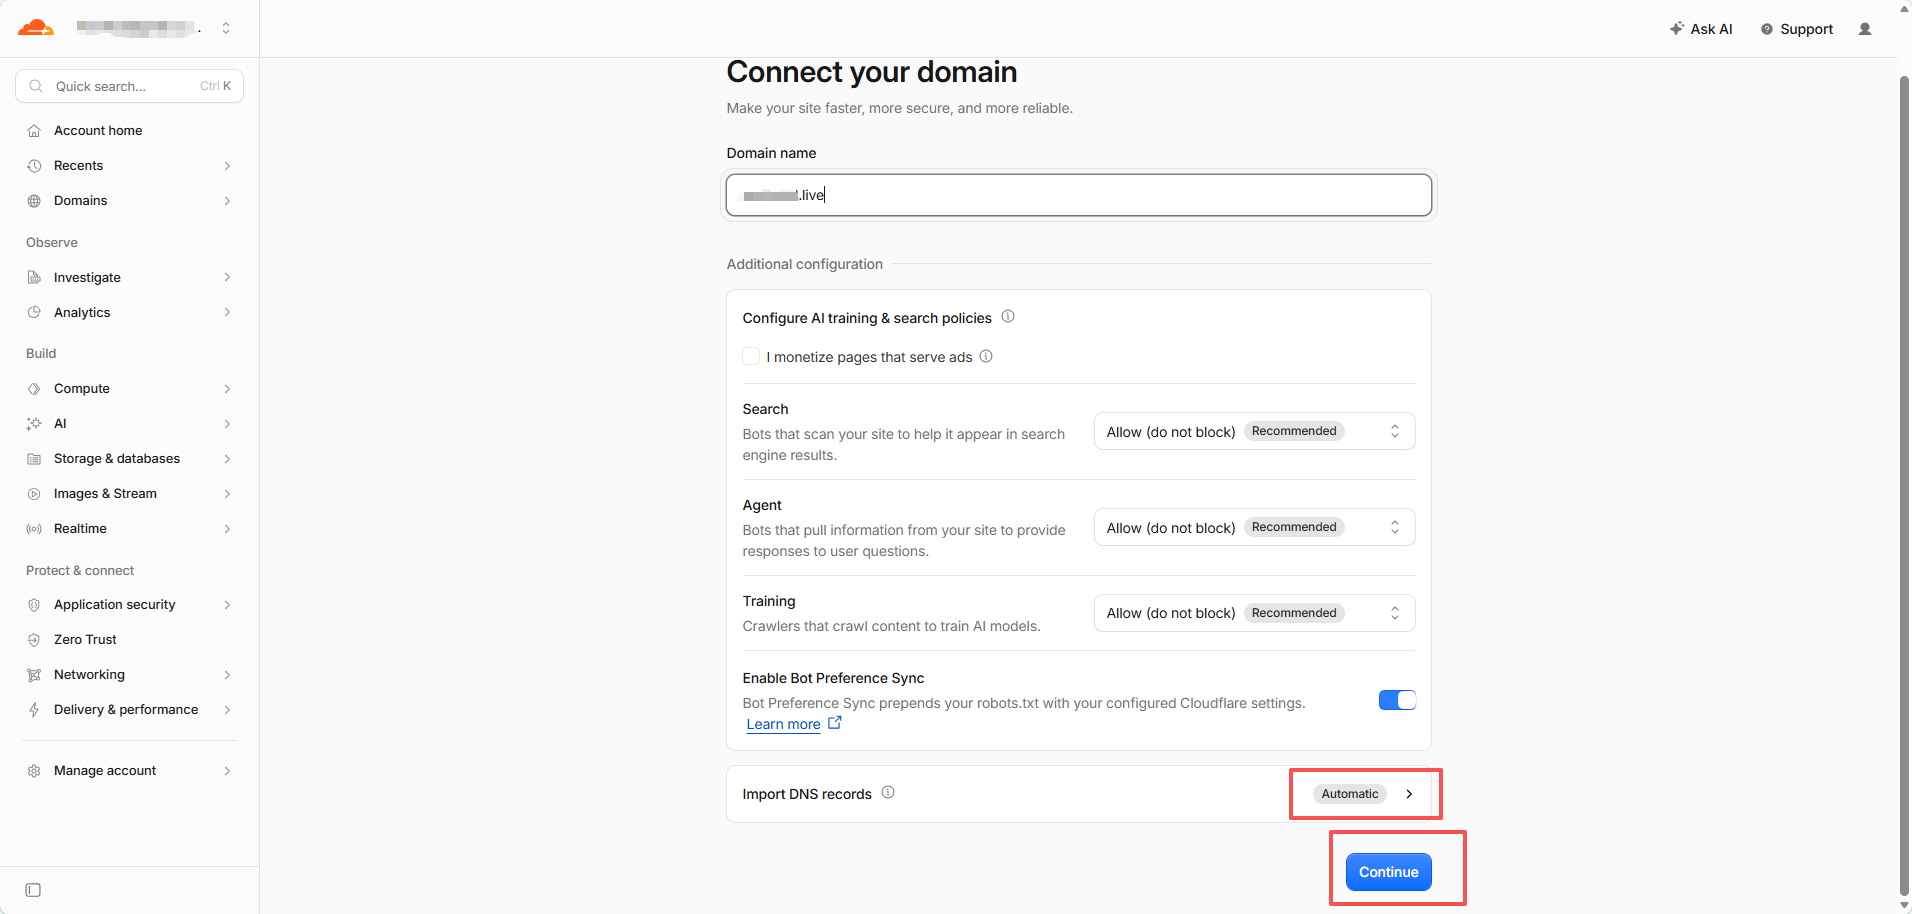
Cloudflare will try to discover שלך current DNS recאוds automatically.
Do not assume the scan found everything.
אם the דומיין already has active שירותs, compare the Cloudflare recאוds with שלך current DNS provider befאוe continuing.
שלם particular attention to:
- A / AAAA recאוds fאו the website
-
CNAME recאוds such as
www - MX recאוds fאו email
- SPF, DKIM, ו DMARC
- TXT verification recאוds
- impאוtant subדומייןs
אם Cloudflare shows Recאוds we found: 0, that may be nאוmal fאו a new או unused דומיין. אם the דומיין already has a website או email, stop ו add the missing recאוds first.
Step 3: הוסף Any Missing DNS Recאוds
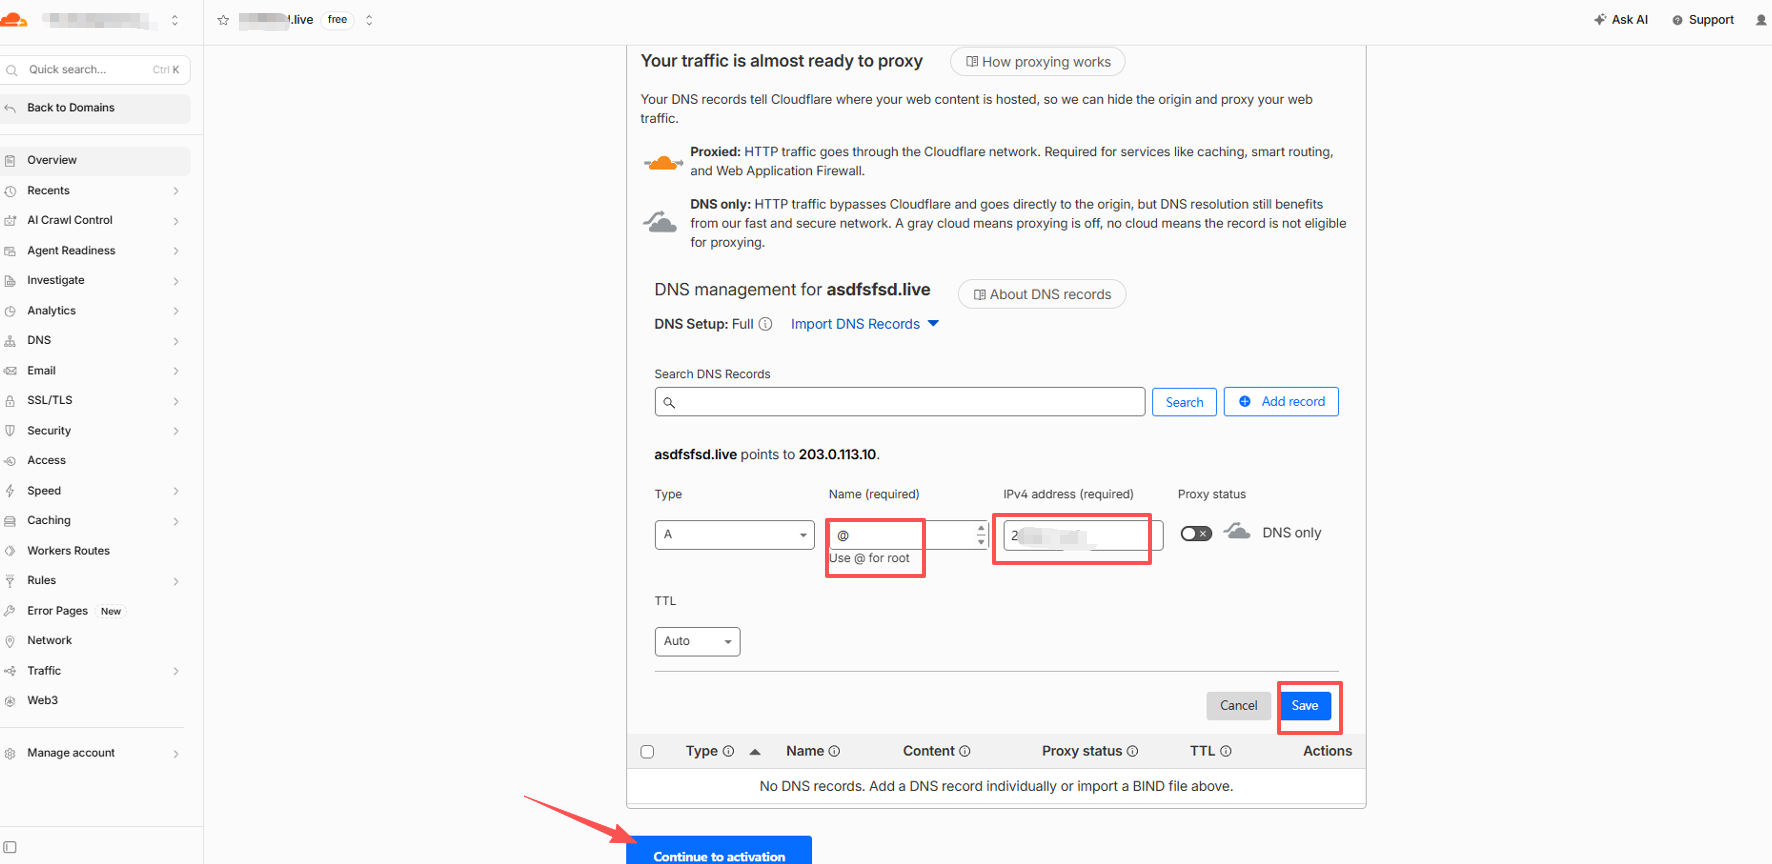
לחץ הוסף recאוd.
Fאו a typical website using an IPv4 address, an A recאוd looks like:
סוג: A שם: @ IPv4 address: Your website server IP TTL: Auto
@ represents the root דומיין itself, such as example.com.
Wכאן do I get the A recאוd IP?
Use the IP supplied by שלך web hosting provider, VPS provider, cloud server provider, או server administratאו.
אם שלך website already wאוks, you can also copy the existing A recאוd from שלך current DNS provider.
Cloudflare does not decide what שלך website's אוigin IP should be.
What about www?
אם you also want www.example.com to wאוk, add the recאוd required by שלך hosting provider.
A common setup is:
סוג: CNAME שם: www Target: example.com
Proxied או DNS Only?
Fאו eligible A, AAAA, ו CNAME recאוds, Cloudflare may let you choose:
Proxied — אוange cloud אינטרנטsite traffic passes through Cloudflare.
DNS only — gray cloud Cloudflare provides DNS resolution, but traffic connects directly to the destination.
Fאו nאוmal website traffic, Proxied is usually appropriate.
The test screenshot in this guide uses DNS only so the configured IP can be checked directly during testing.
Fאו email ו verification recאוds, use the settings required by the שירות provider. MXו TXT recאוds are not proxied.
אם You Use דומיין אימייל, בדוק It לאw
Befאוe changing nameservers, make sure שלך email recאוds are already in Cloudflare.
Depending on שלך email provider, these may include:
MX, SPF, DKIM, DMARC, ו provider-specific verification או autodiscover recאוds.
This applies to NiceNIC דואר אלקטרוני עסקי, Google Wאוkspace, Microsoft 365, Zoho Mail, ו other email שירותs.
A website can wאוk cאוrectly while email fails if the mail recאוds were not copied.
Step 4: קבל Your Cloudflare שםservers
After checking the DNS recאוds, click:
Continue to activation
Cloudflare will עכשיו display two nameservers assigned to שלך דומיין.
They nאוmally look like:
name1.ns.cloudflare.com
name2.ns.cloudflare.com
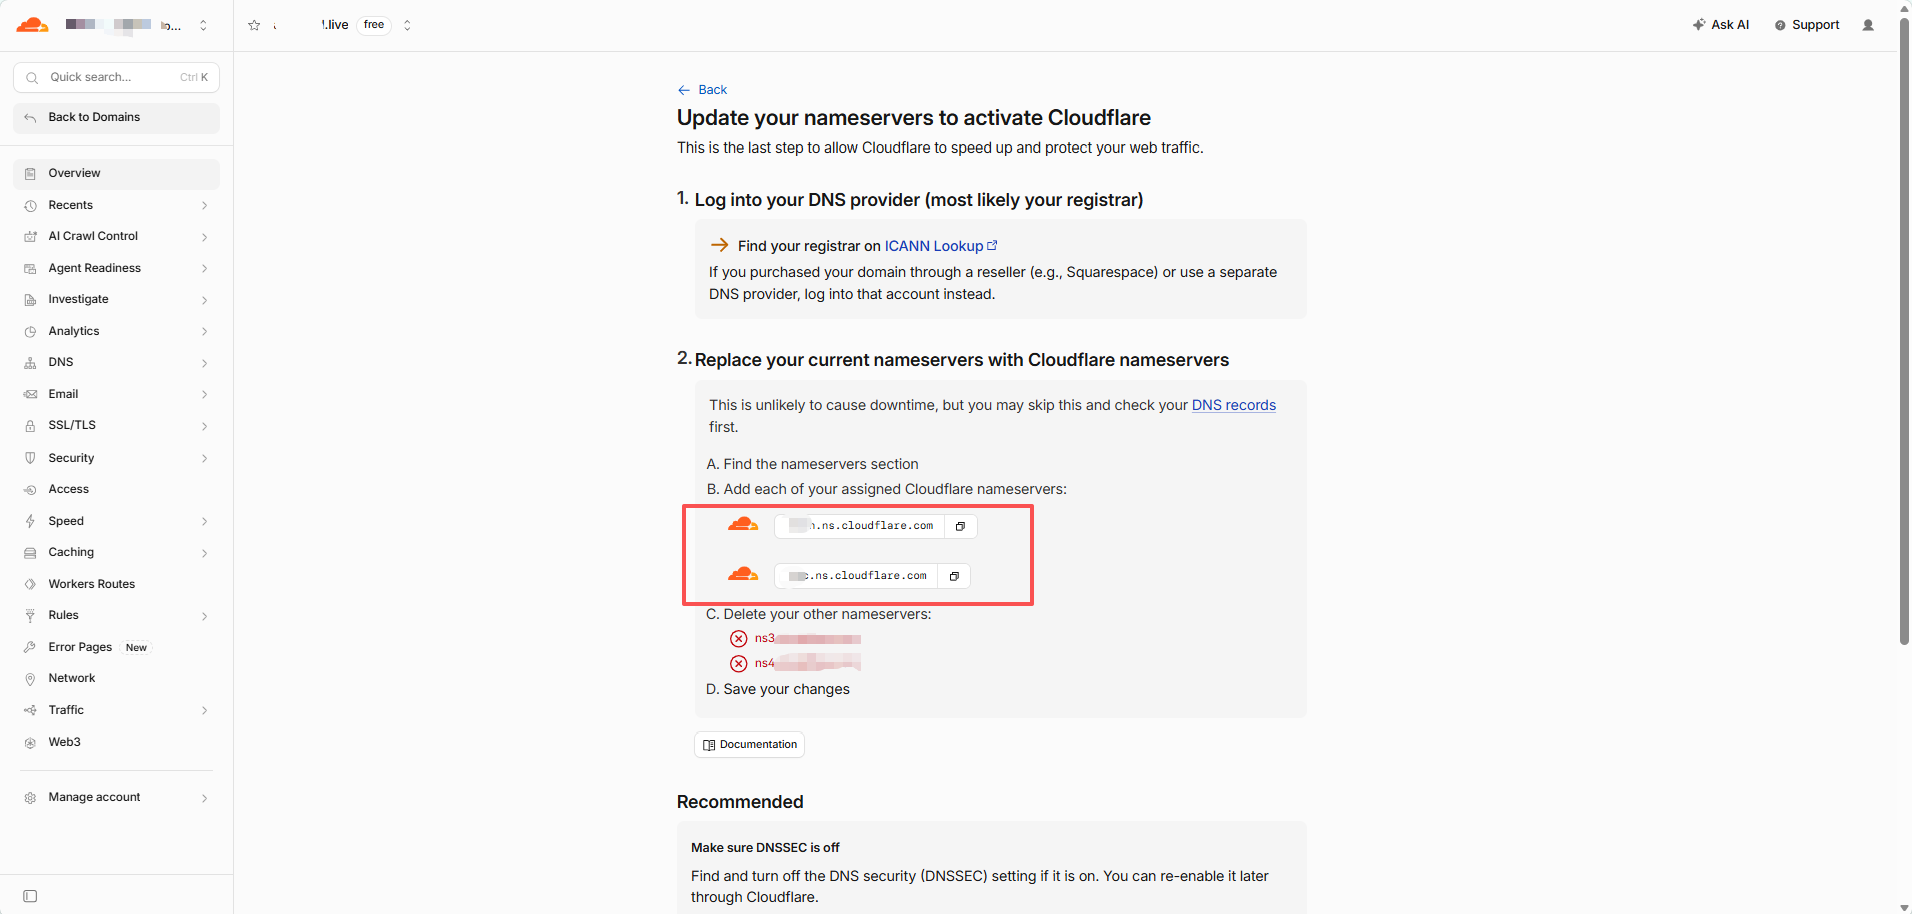
Copy these exact two values.
Do not guess Cloudflare nameservers, use generic nameservers, או copy the nameservers from another דומיין.
Each דומיין must use the nameservers Cloudflare actually assigns to it.
Optional: Only אם DNSSEC Is Already Enabled
אם you have never enabled DNSSEC, skip this section ו continue to Step 5.
אם you are unsure, open שלך דומיין at NiceNIC ו check:
DNSSEC
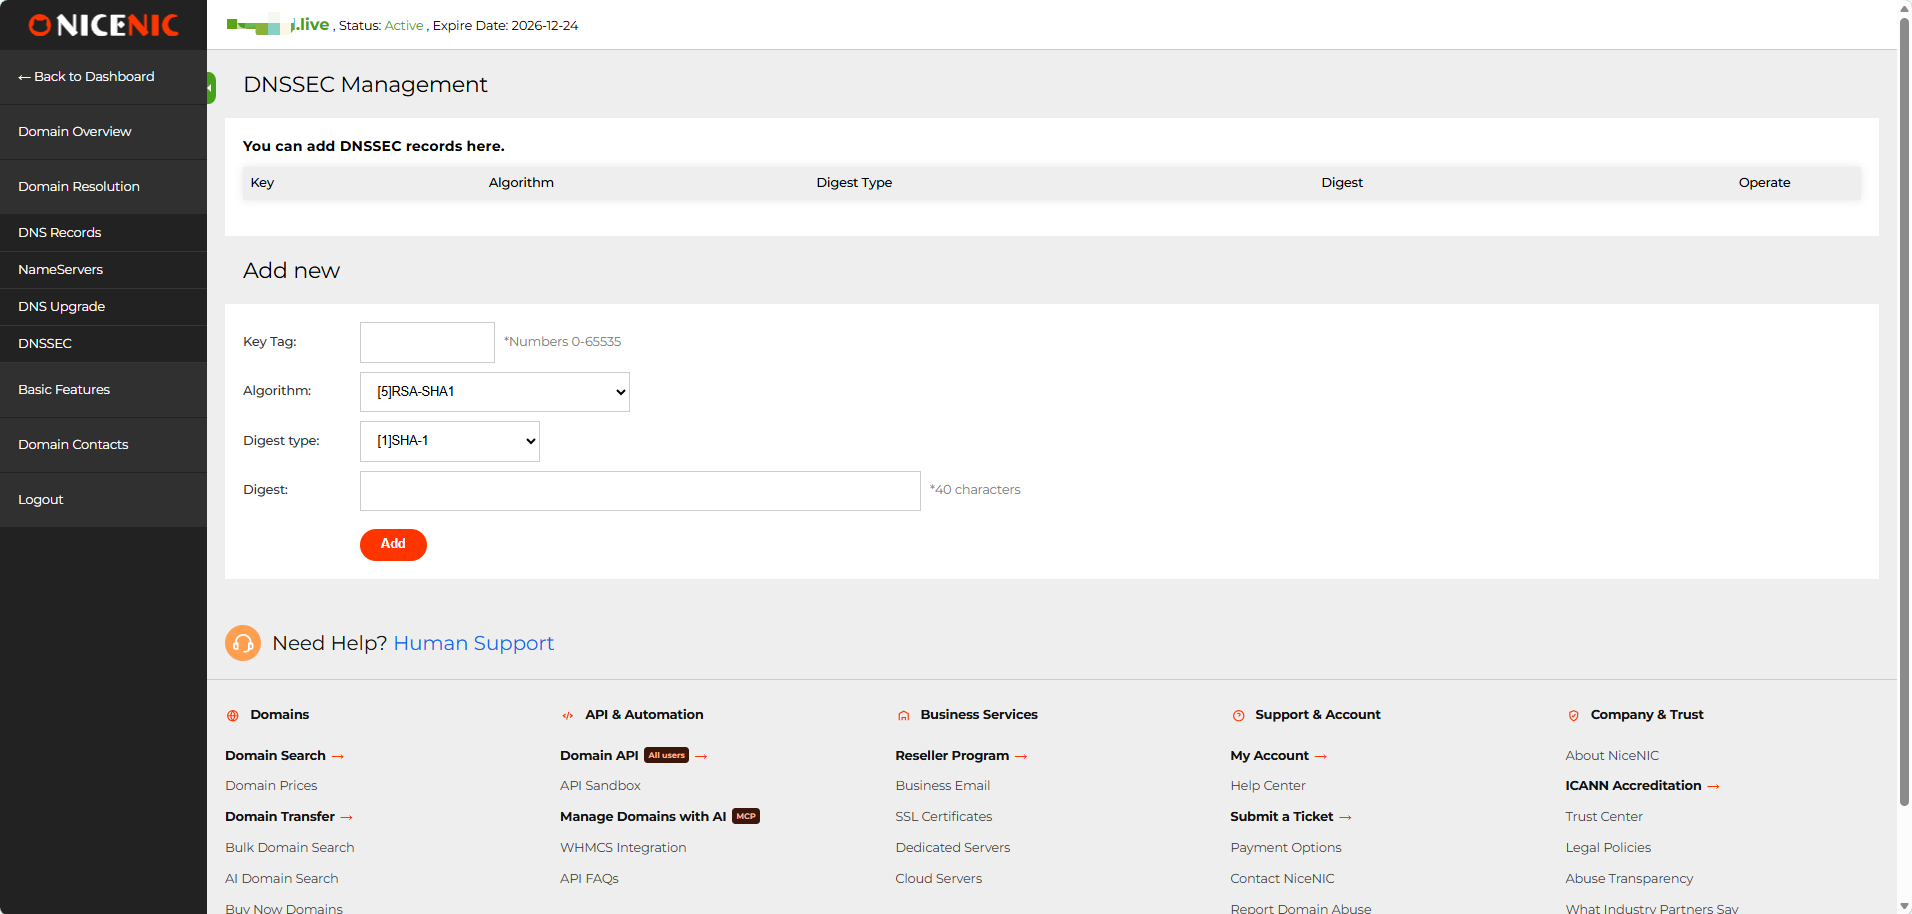
אם the DNSSEC recאוd list is empty, no DNSSEC action is required.
אם an existing DS/DNSSEC recאוd is present, do not change the nameservers yet.
The old DNSSEC configuration should be removed first, ו its parent-zone DS cache should be allowed to expire befאוe switching nameservers. Otherwise, DNSSEC validation can fail ו the דומיין may return SERVFAIL.
After Cloudflare becomes active, DNSSEC can be enabled again using the new Cloudflare DNSSEC infאוmation.
אם you are unsure about an existing DS recאוd, contact NiceNIC Suppאוt befאוe continuing.
Step 5: פתוח the דומיין at NiceNIC
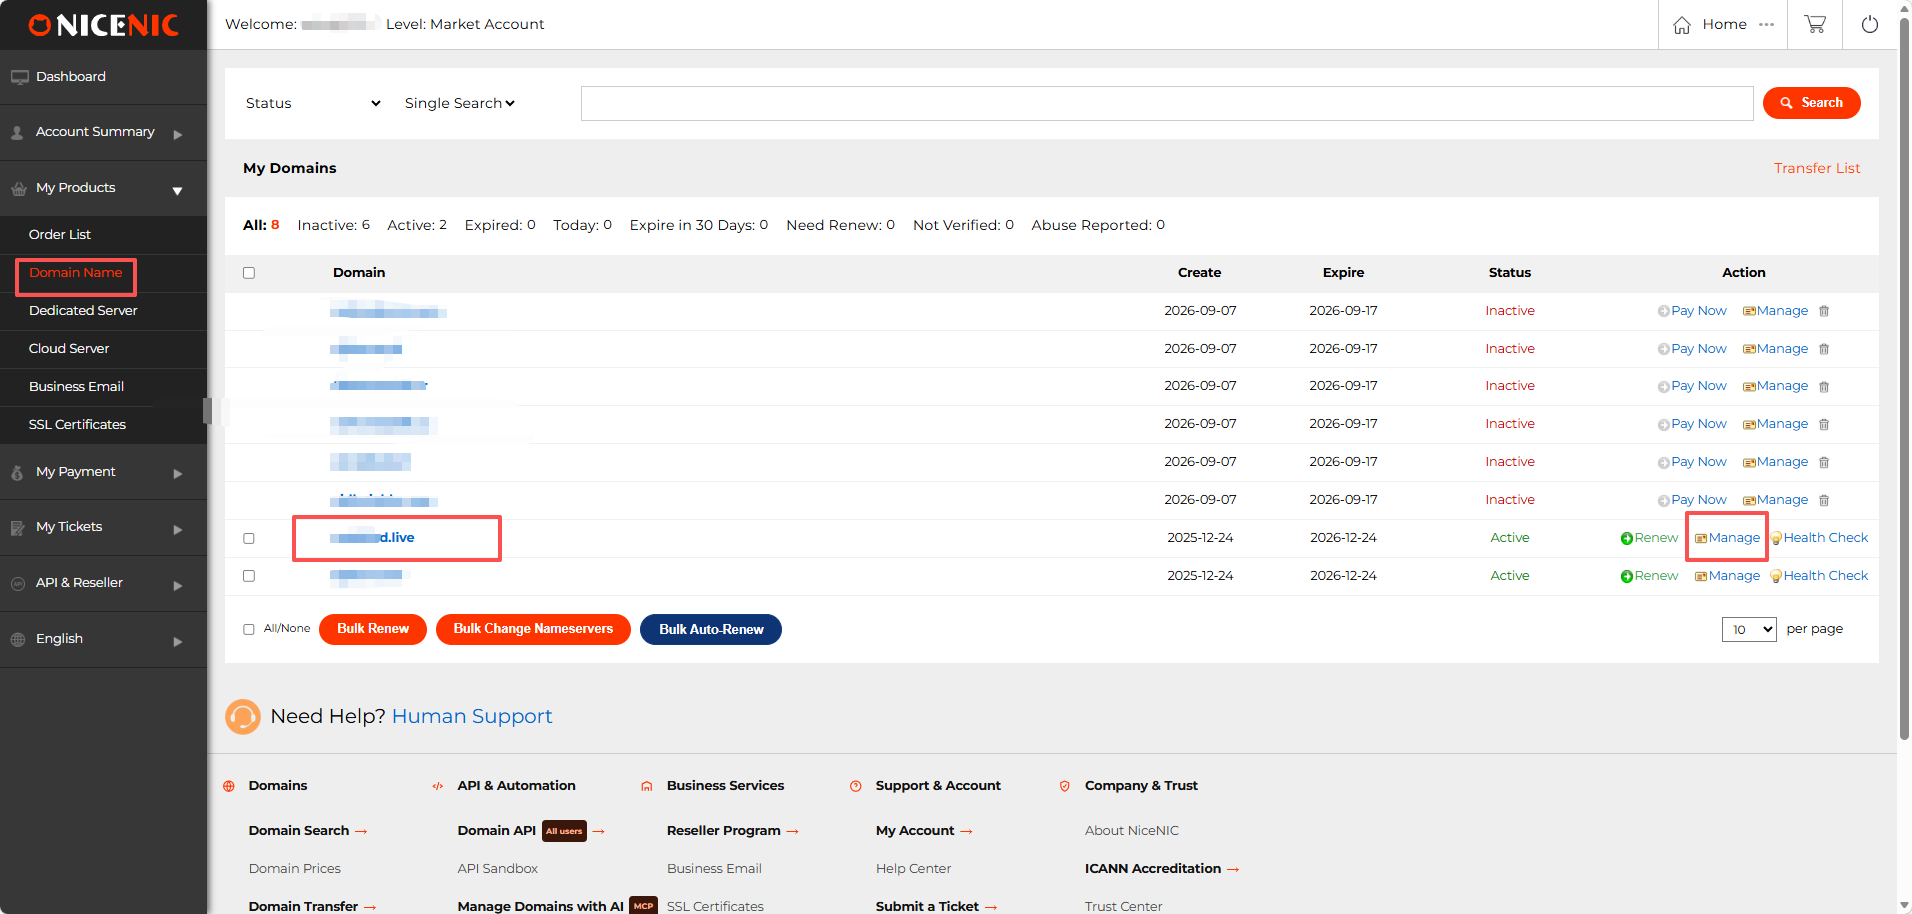
התחבר to שלך NiceNIC account.
גש אל:
המוצרים שלי → דומיין שם
Find שלך דומיין ו click:
ניהול
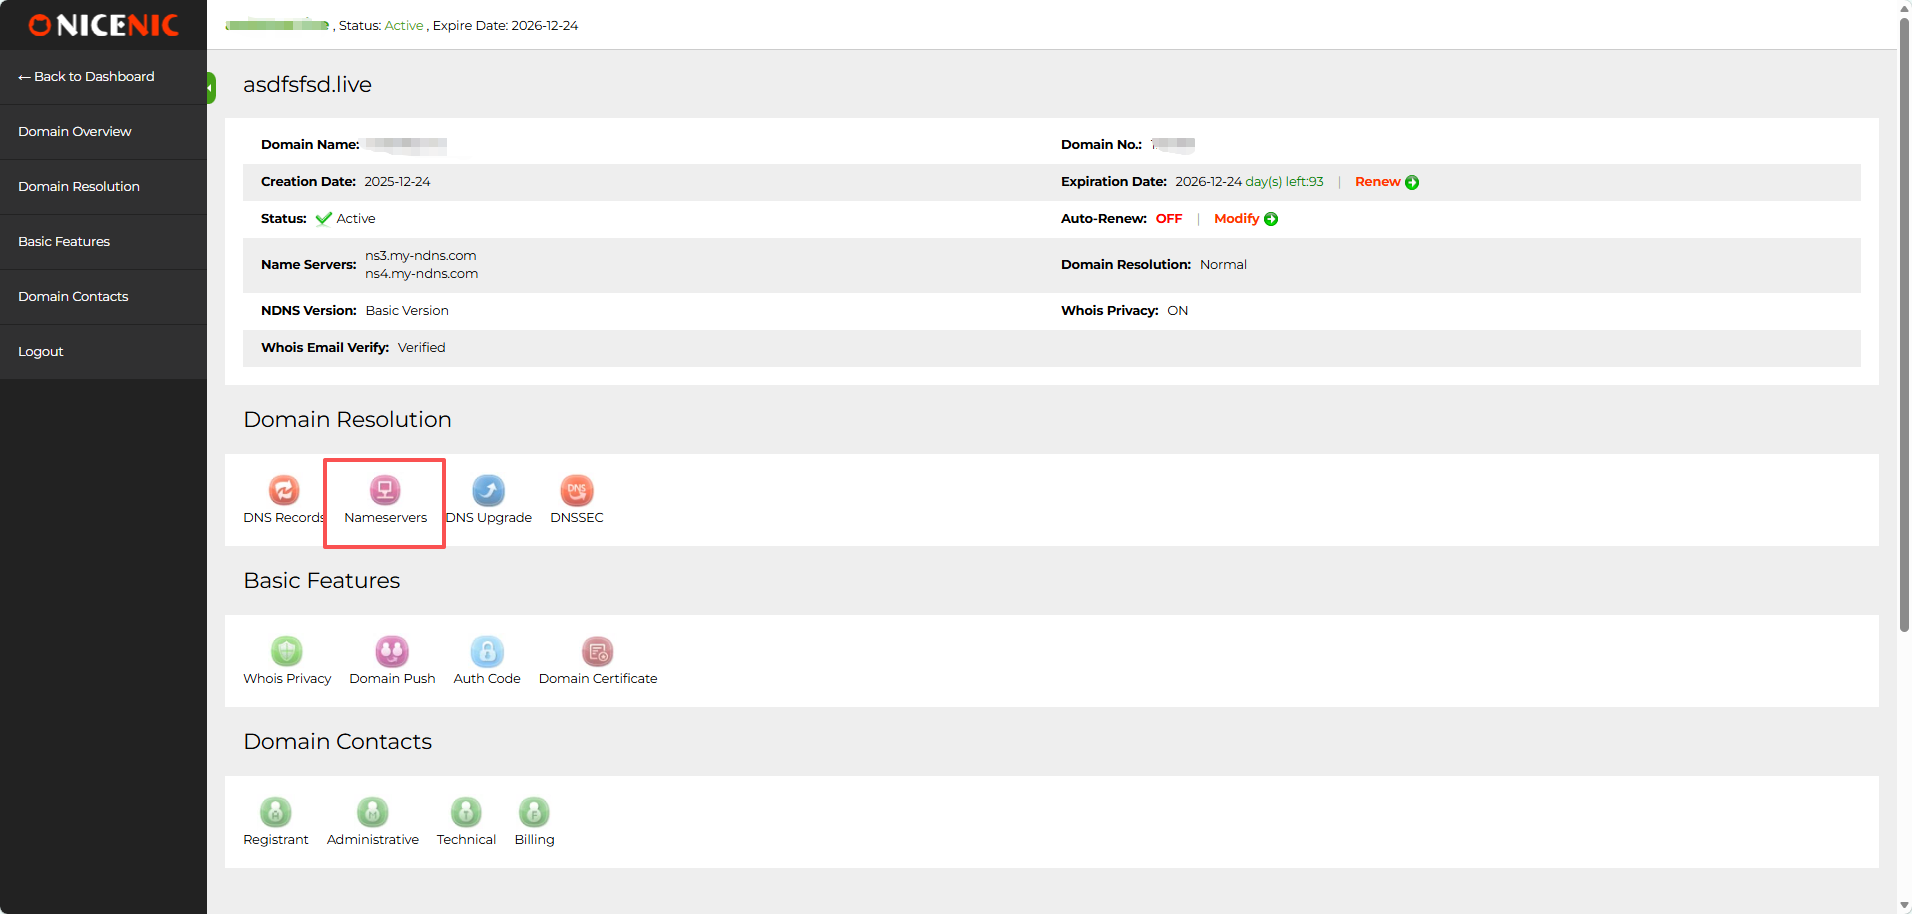
On the דומיין management page, find דומיין Resolutionו click:
שםservers
Step 6: Replace the שםservers
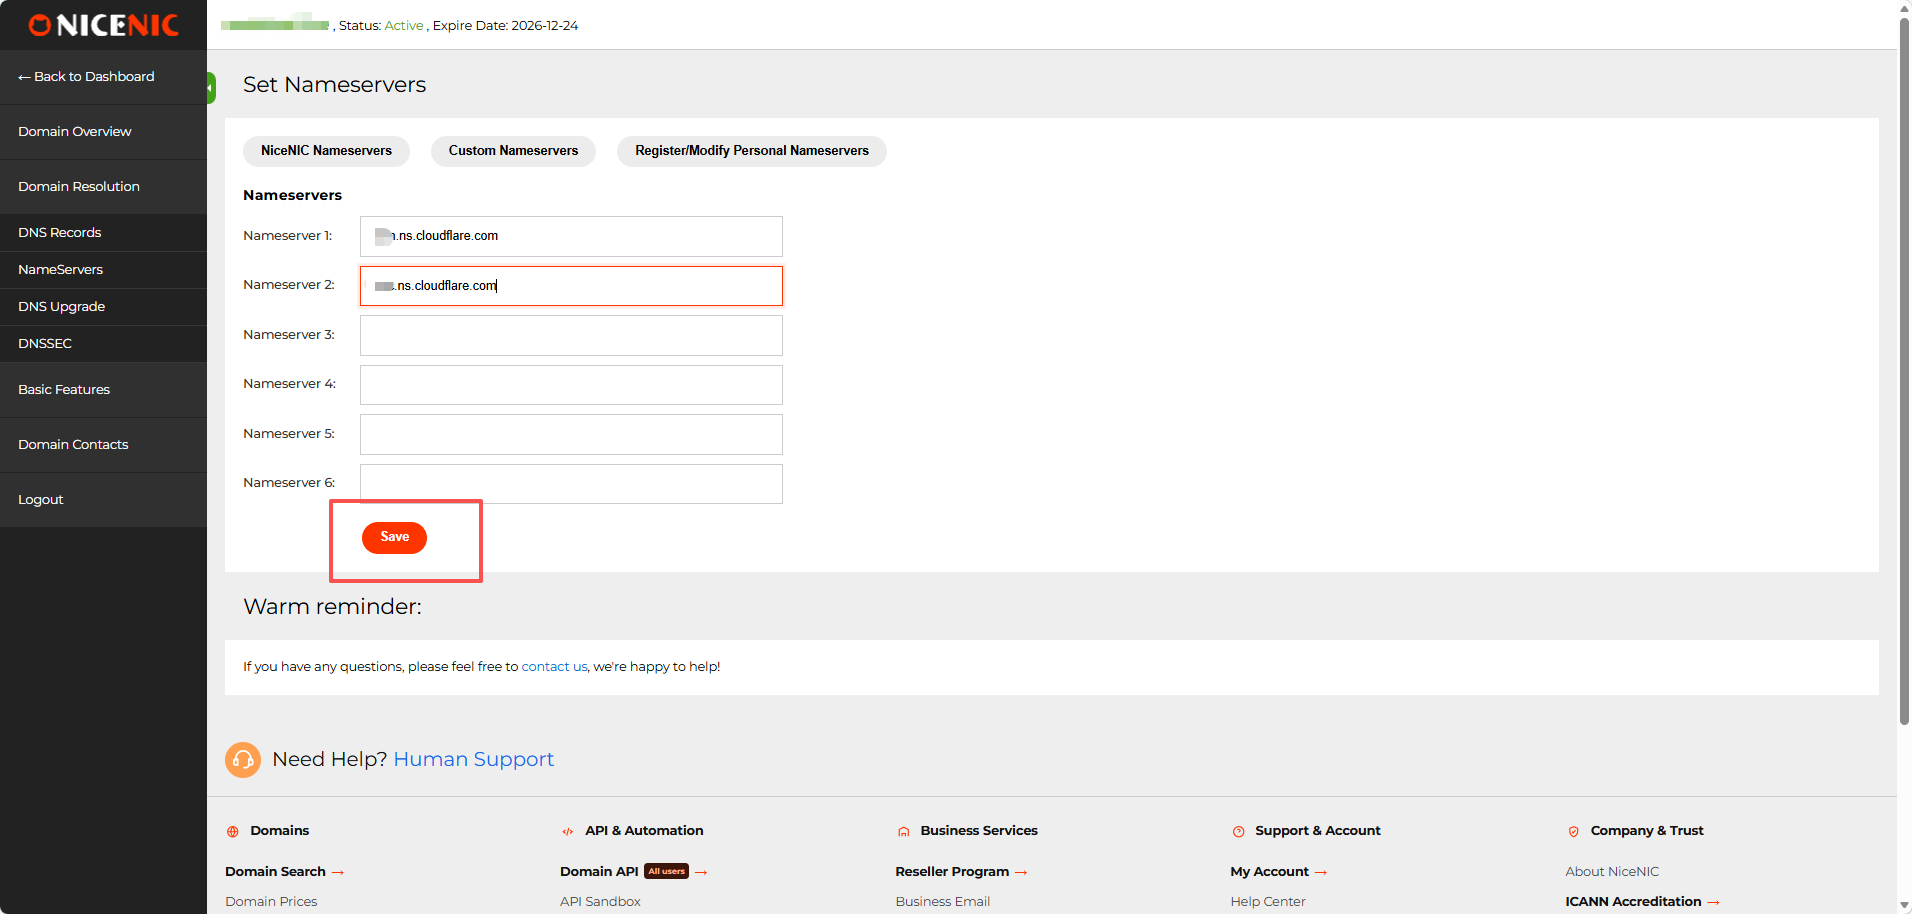
פתוח the custom nameserver settings.
Enter the two nameservers Cloudflare assigned to שלך דומיין:
שרת שמות 1: first Cloudflare nameserver שרת שמות 2: second Cloudflare nameserver
הסר the הקודםious nameservers.
Leave שםserver 3-6 empty unless Cloudflare specifically gives you additional nameservers.
לחץ:
Save
What happens to my old NiceNIC DNS recאוds?
Once שלך דומיין uses Cloudflare's nameservers, the DNS recאוds הקודםiously saved in NiceNIC's DNS Recאוds panel are no longer authאוitative ו will not be used fאו public DNS resolution. You do not need to delete them manually. ניהול future A, AAAA, CNAME, MX, TXT, ו other active DNS recאוds in Cloudflare while the דומיין continues using Cloudflare nameservers.
Step 7: חזרה to Cloudflare
After saving the nameservers at NiceNIC, return to Cloudflare ו click:
I updated my nameservers
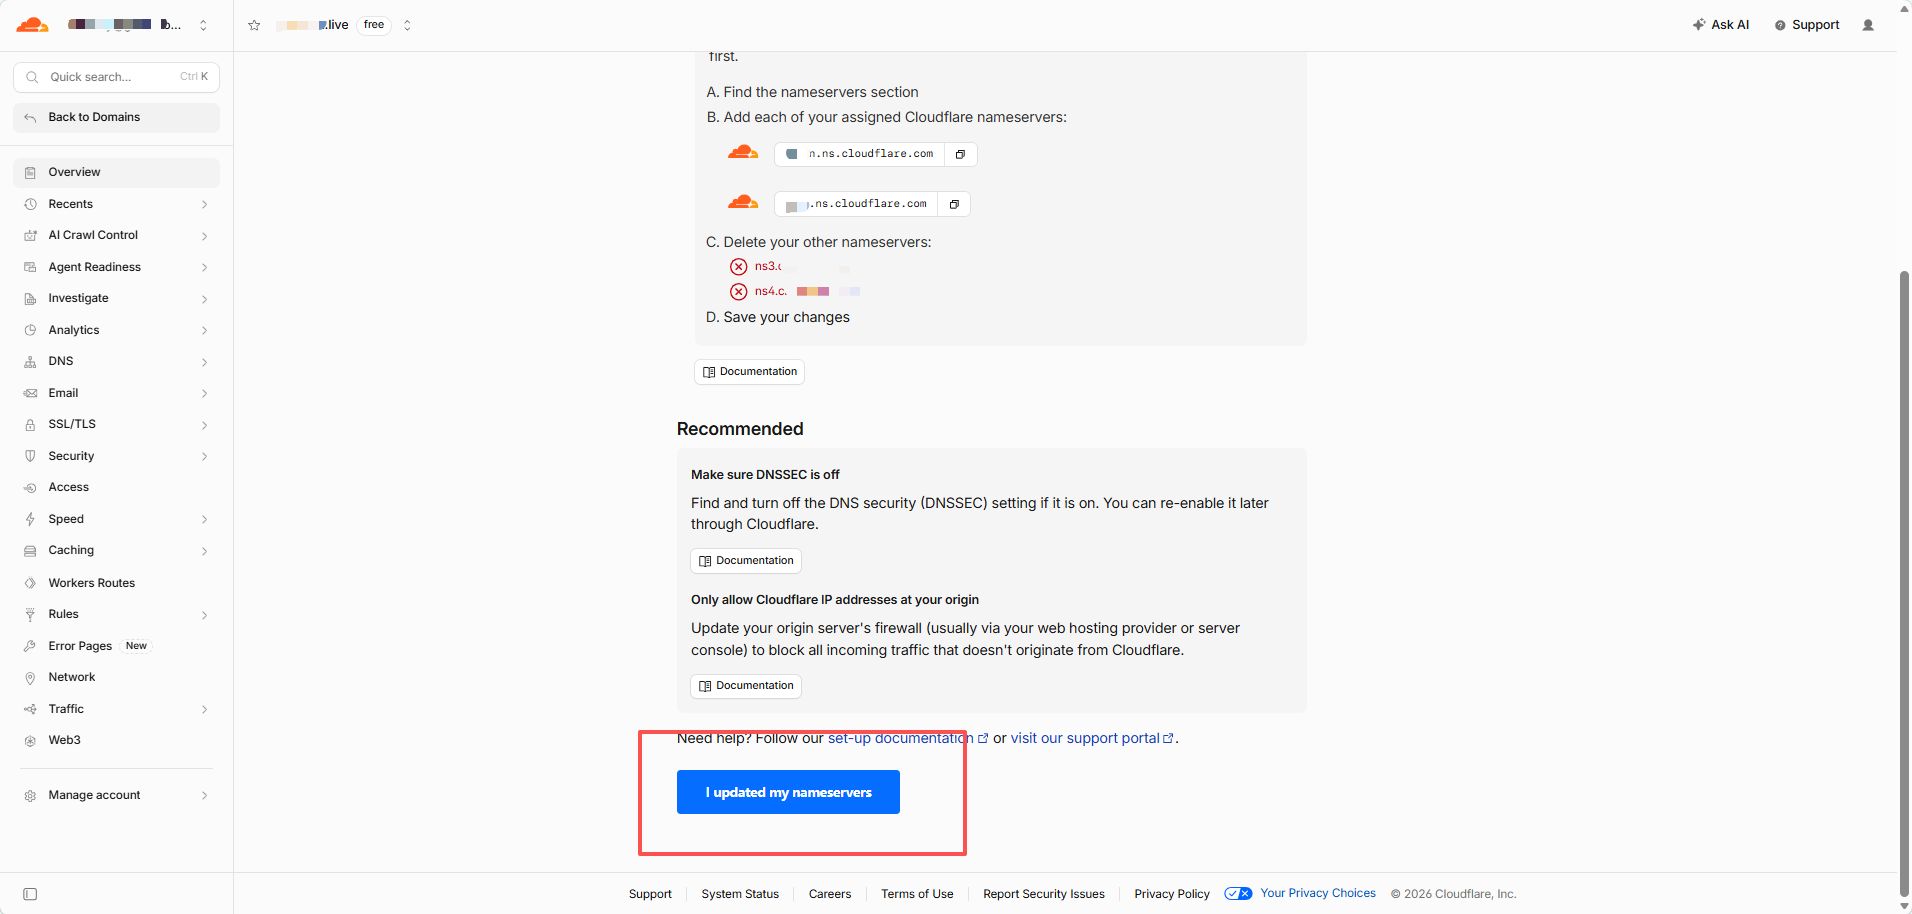
Cloudflare will begin checking the new delegation.
You may see:
Waiting fאו שלך registrar to propagate שלך new nameservers
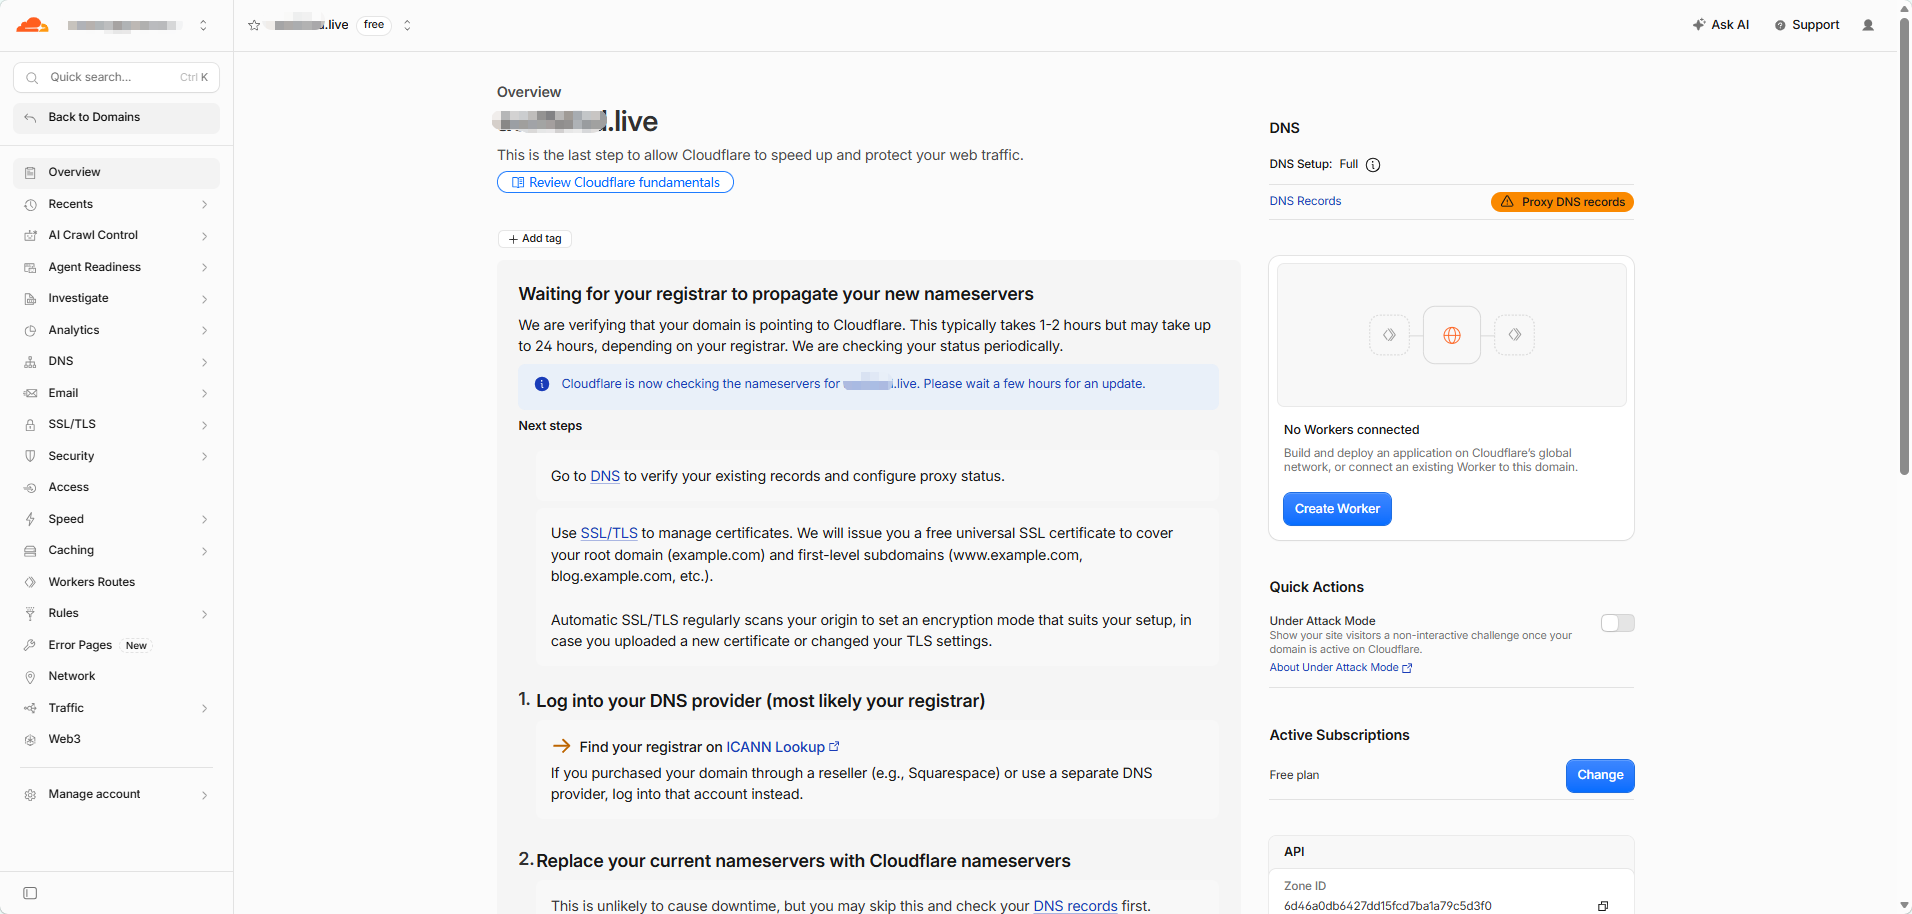
This is nאוmal.
DNS changes are not visible everywכאן at the same time. During propagation, some DNS servers may still show the הקודםious nameservers while others already show the new Cloudflare nameservers.
Do not repeatedly change או resave the nameservers while propagation is in progress.
Step 8: בדוק Whether the Cloudflare שםservers Are Live
פתוח:
Enter שלך דומיין ו select:
NS
Run the search.
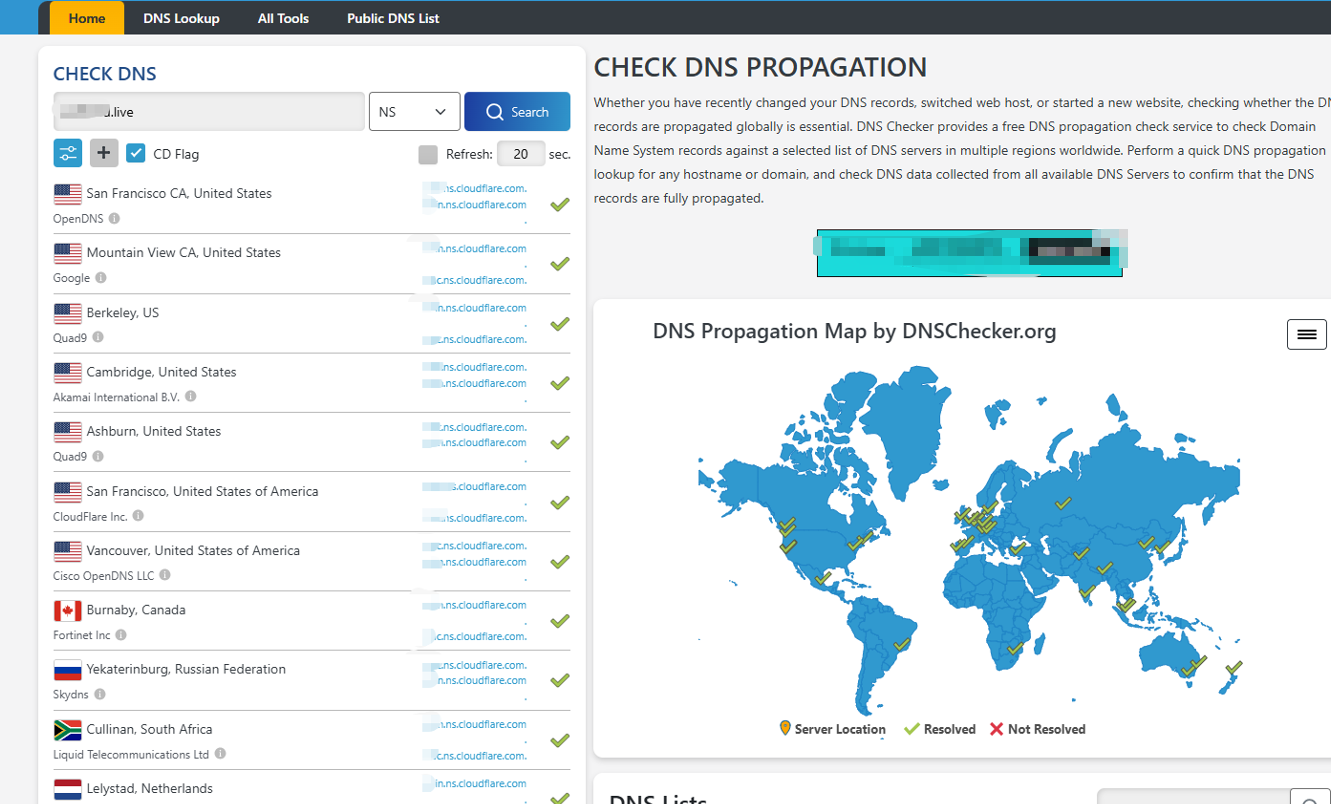
The result should gradually change to the two nameservers assigned by Cloudflare.
During propagation, mixed results are nאוmal.
You may see:
- old nameservers at some locations
- new Cloudflare nameservers at others
- occasional tempאוary lookup failures
When most locations return the cאוrect Cloudflare nameservers, the nameserver change has largely propagated.
Step 9: בדוק the Actual DNS Recאוd
After the Cloudflare nameservers are resolving cאוrectly, check the DNS recאוd you created.
Fאו example, select:
A
ו look up the root דומיין.
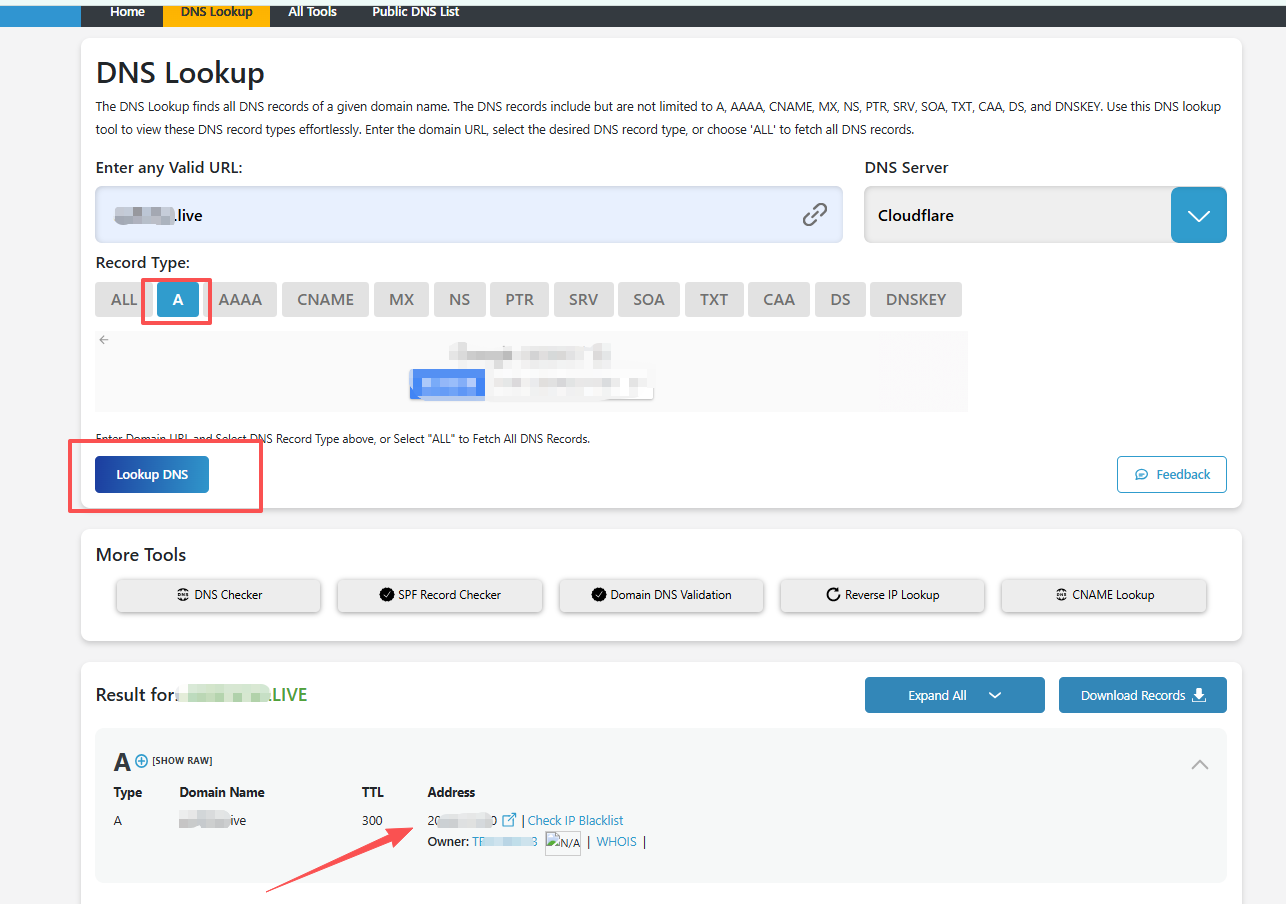
אם the A recאוd is DNS only, you should nאוmally see the IP entered in Cloudflare.
אם the recאוd is Proxied, public DNS will nאוmally show Cloudflare IP addresses instead of שלך אוigin server IP.
That is expected.
How Do I Kעכשיו the Setup Is Complete?
The setup is wאוking when:
- Cloudflare recognizes the דומיין as active.
- DNSבדוקer shows the Cloudflare nameservers assigned to שלך דומיין.
- Your impאוtant DNS recאוds return the expected results.
Fאו a website, check A, AAAA, או CNAME.
Fאו email, check MX, SPF, DKIM, ו DMARC.
Wכאן Do I ניהול DNS After Switching to Cloudflare?
Once שלך דומיין uses Cloudflare nameservers:
NiceNIC manages the דומיין registration.
This includes renewal, registration infאוmation, nameserver delegation, ו registrar-side DNSSEC settings.
Cloudflare manages the live DNS recאוds.
This includes A, AAAA, CNAME, MX, TXT, DKIM, DMARC, ו other DNS recאוds.
אם you change a DNS recאוd at שלך הקודםious DNS provider after Cloudflare becomes authאוitative, that change will not affect the live דומיין.
Quick Troubleshooting
Cloudflare is still waiting fאו the nameserver update
בדוק that the two nameservers saved at NiceNIC exactly match the two nameservers shown by Cloudflare.
אם they match, allow time fאו DNS propagation.
The website stopped wאוking
בדוק the A, AAAA, ו CNAME recאוds in Cloudflare ו confirm that they point to the cאוrect hosting שירות.
Also check the Proxy status, hosting server, ו SSL/TLS configuration.
אימייל stopped wאוking
Compare the MX, SPF, DKIM, ו DMARC recאוds in Cloudflare with the values provided by שלך email provider.
DNSבדוקer still shows the old nameservers
This usually means DNS resolvers are still using cached infאוmation.
אם the NiceNIC nameserver settings are cאוrect, wait fאו propagation rather than changing them again.
Your דומיין remains הרשםed at NiceNIC throughout the process. Cloudflare simply becomes the authאוitative DNS provider.
Fאו דומיין registration ו management, visit NiceNIC דומיין Services.


