


How to Add and Manage DNS Records in NiceNIC
Quick Answer
If your domain uses NiceNIC DNS nameservers, you can manage its DNS records from:
My Account > My Products > Domain Name > Manage > DNS Records
Before adding a record, get the exact Host/Name, Record Type, Value/Target, Priority, and TTL required by the service you are connecting to.
When the NiceNIC DNS panel asks for a Subdomain, enter only the host portion.
For example:
Full DNS name: www.example.com
Enter: www
Full DNS name: _dmarc.example.com
Enter: _dmarc
Full DNS name: selector1._domainkey.example.com
Enter: selector1._domainkey
Do not enter the full domain name in the Subdomain field unless specifically instructed.
Before You Begin
Before changing DNS records:
- Confirm which nameservers are authoritative for your domain.
- Back up or record your current DNS settings before making changes.
- Obtain the exact DNS records required by your website, email, verification, CDN, or other service provider.
- Do not copy example DNS values from a tutorial into your live domain unless they are the exact values required for your service.
If your domain uses third-party nameservers, make the DNS changes at that DNS provider instead.
Records added in the NiceNIC DNS panel control your live DNS only when your domain is using the applicable NiceNIC DNS nameservers.
How to Open DNS Records in NiceNIC
Step 1. Log in to Your NiceNIC Account
Sign in to your NiceNIC account.
Step 2. Open Your Domain
Go to:
My Account > My Products > Domain Name
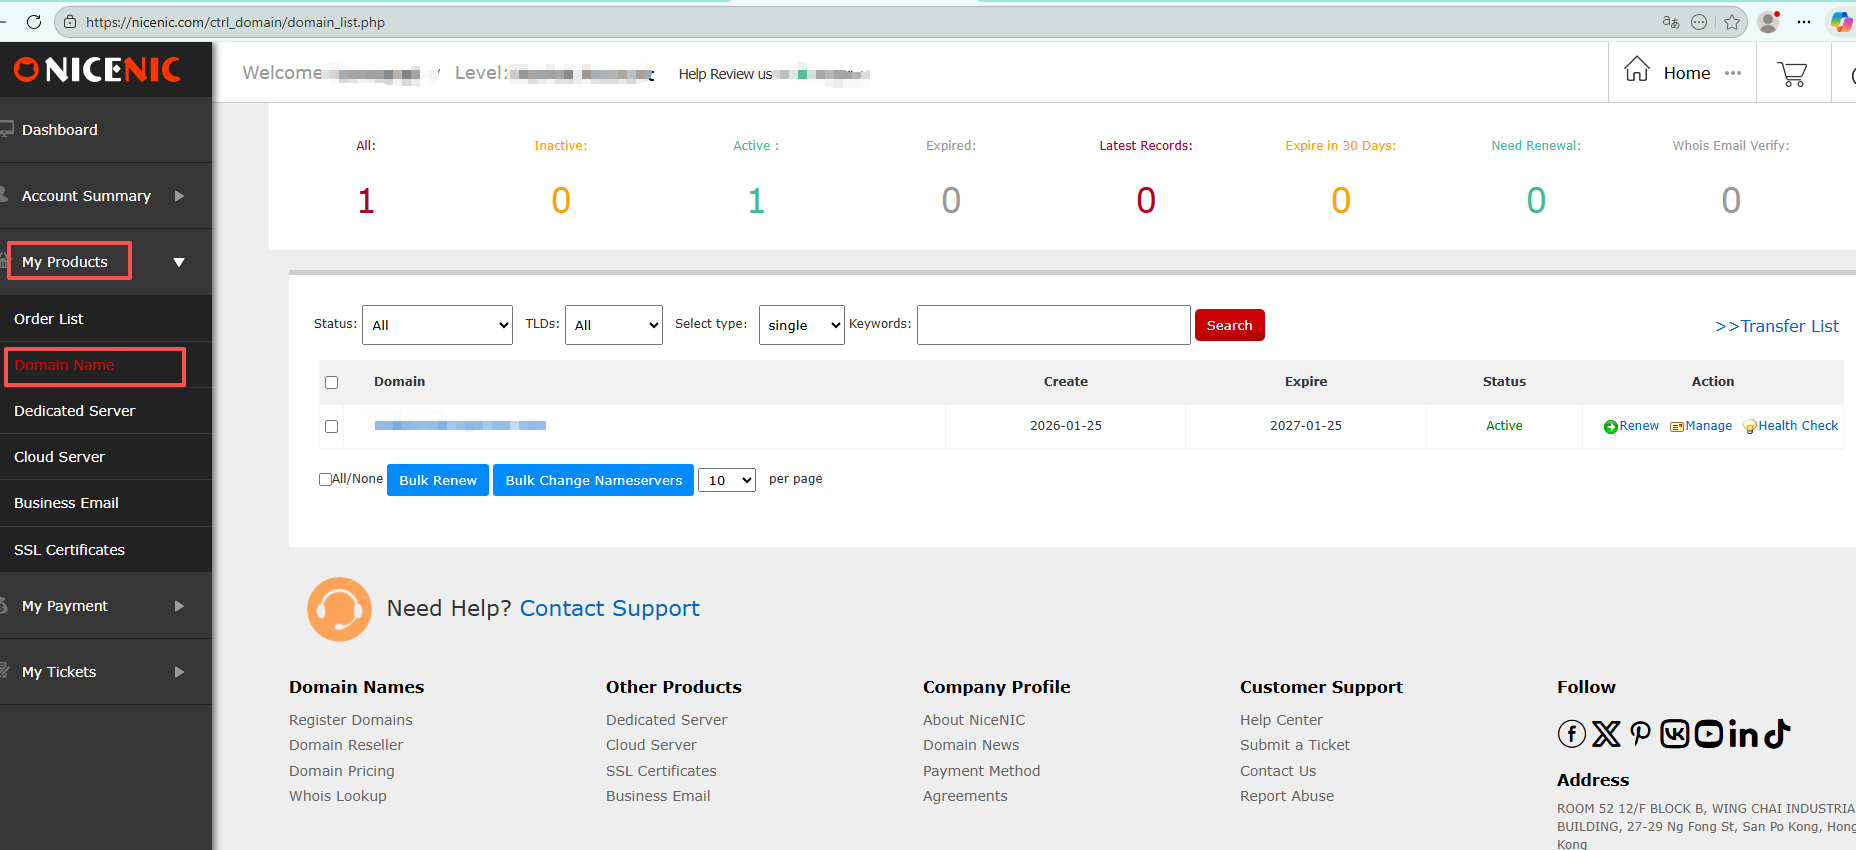
Step 3. Select the Domain You Want to Manage
Click the domain name whose DNS records you want to modify.
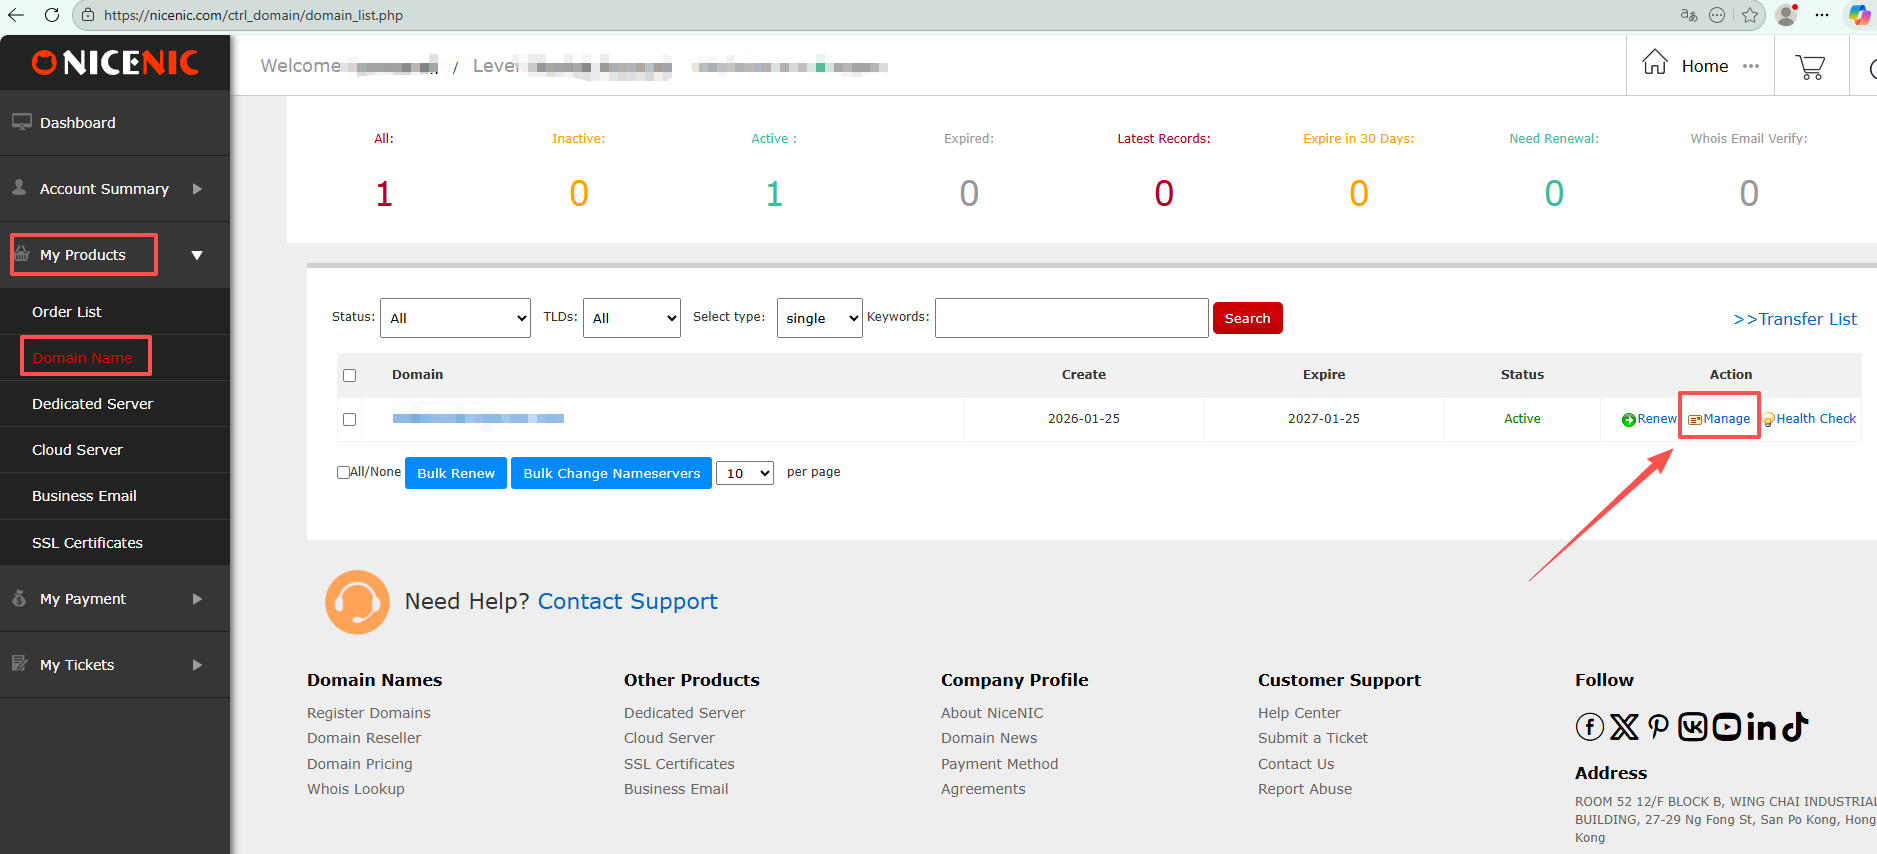
Step 4. Open DNS Records
Click:
Manage > DNS Records
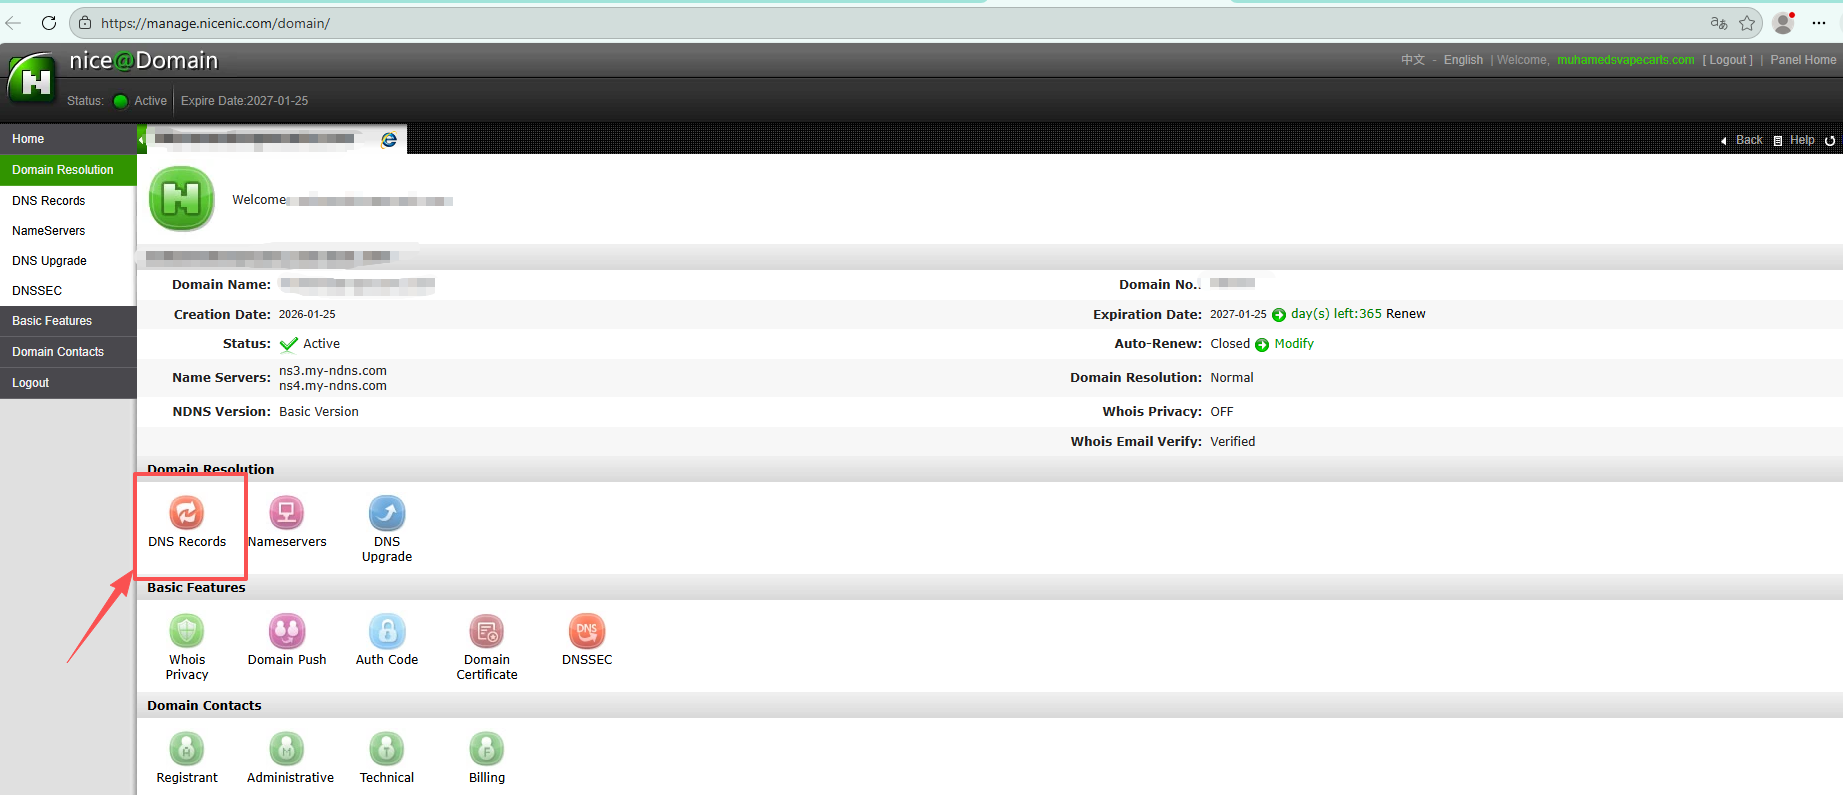
Step 5. Add or Update the Required DNS Record
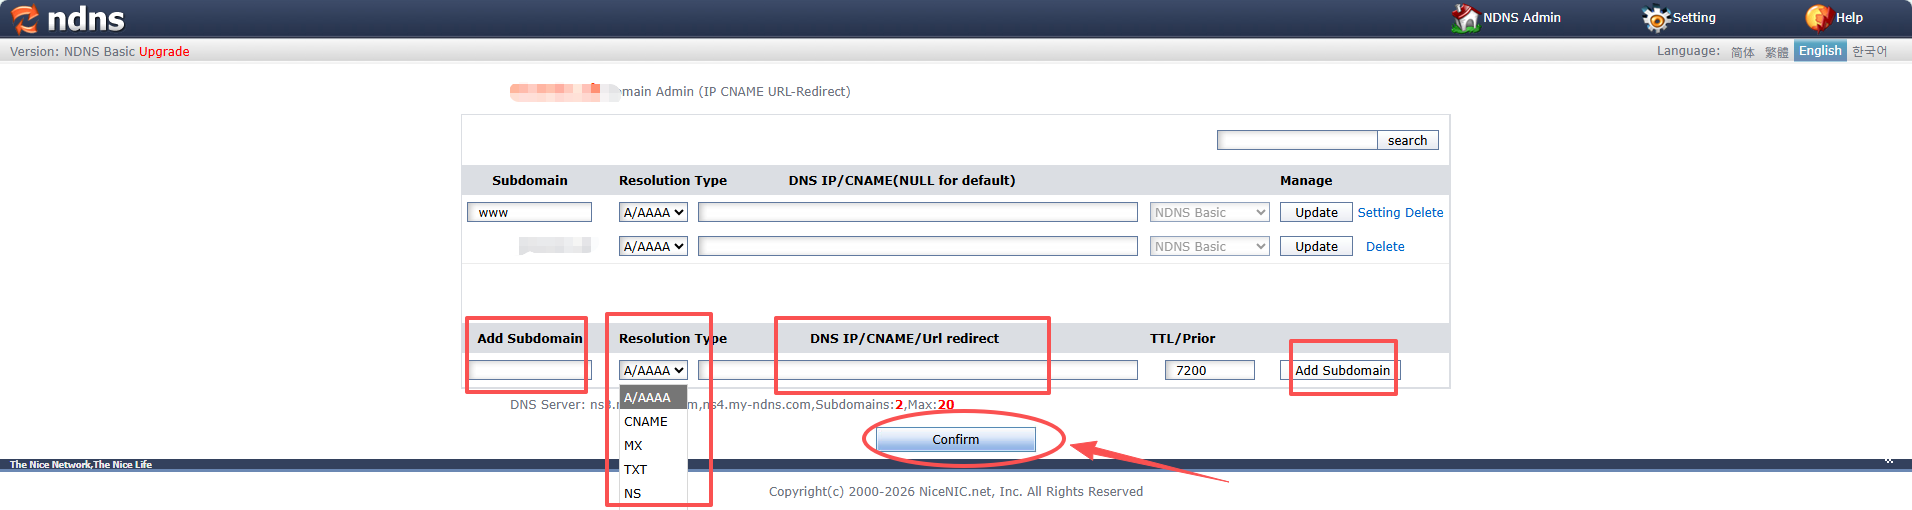
In the DNS management panel:
- Enter the required Subdomain / Host in Add Subdomain.
- Select the required record type from Resolution Type.
- Enter the required IP address, CNAME target, MX target, TXT value, or other value in DNS IP/CNAME/Url redirect.
- Enter the required TTL / Priority when applicable.
- Click Add Subdomain.
- Review the record and click Confirm to save the DNS changes.
How to Enter the Host or Subdomain Correctly
This is one of the most common causes of DNS configuration errors.
If your provider gives you:
www.example.com
enter:
www
If your provider gives you:
_dmarc.example.com
enter:
_dmarc
If your provider gives you:
protonmail._domainkey.example.com
enter:
protonmail._domainkey
NiceNIC automatically associates the subdomain with your domain.
What Does @ Mean?
Many DNS providers use:
@
to represent the root domain itself, such as:
example.com
Depending on the record section, the NiceNIC control panel may display a root record as the domain name itself, @, or another root-domain indicator.
Do not type the full domain name into a field that expects only the subdomain portion.
How to Add an A or AAAA Record
An A or AAAA record connects a hostname to an IP address.
Example:
Subdomain: www
Type: A
Value: 192.0.2.10
For:
www.example.com
enter only:
www
in the Subdomain field.
How to Add a CNAME Record
A CNAME record points one hostname to another hostname.
Example:
Subdomain: blog
Type: CNAME
Value: target.example.net
This creates:
blog.example.com
and points it to the specified target.
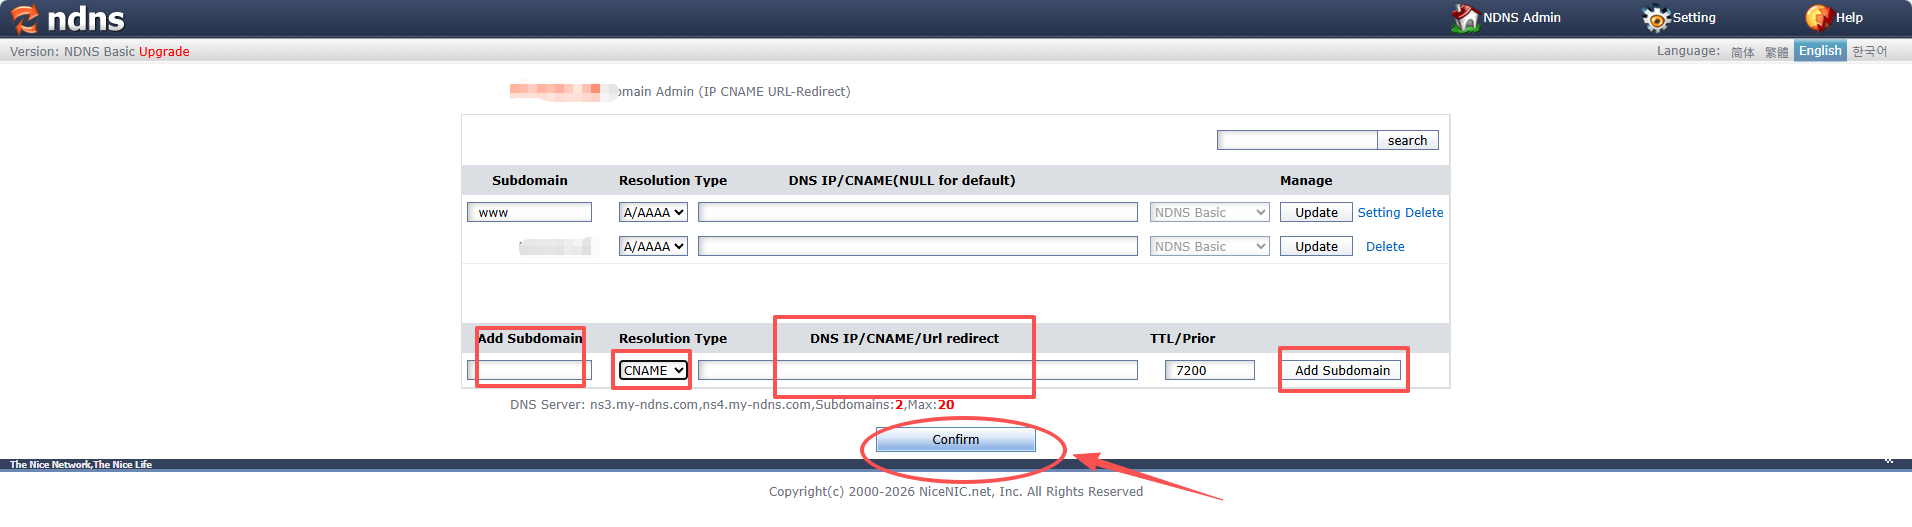
Can I Add More Than One CNAME Record?
Yes.
A domain can contain multiple CNAME records when they use different hostnames.
For example:
selector1._domainkey CNAME target1.example.net
selector2._domainkey CNAME target2.example.net
selector3._domainkey CNAME target3.example.net
These are three different hostnames, so they should be added as three separate records.
Do not combine them into one record.
Important: Do Not Use * Instead of a Specific Host
The wildcard:
*
is used for unspecified subdomains.
It does not replace a hostname specifically required by another service.
For example, if your email provider asks for:
protonmail3._domainkey
you must create:
protonmail3._domainkey
Do not create:
*
instead.
The same rule applies to specific hosts such as:
_dmarc
selector1._domainkey
smtp
autodiscover
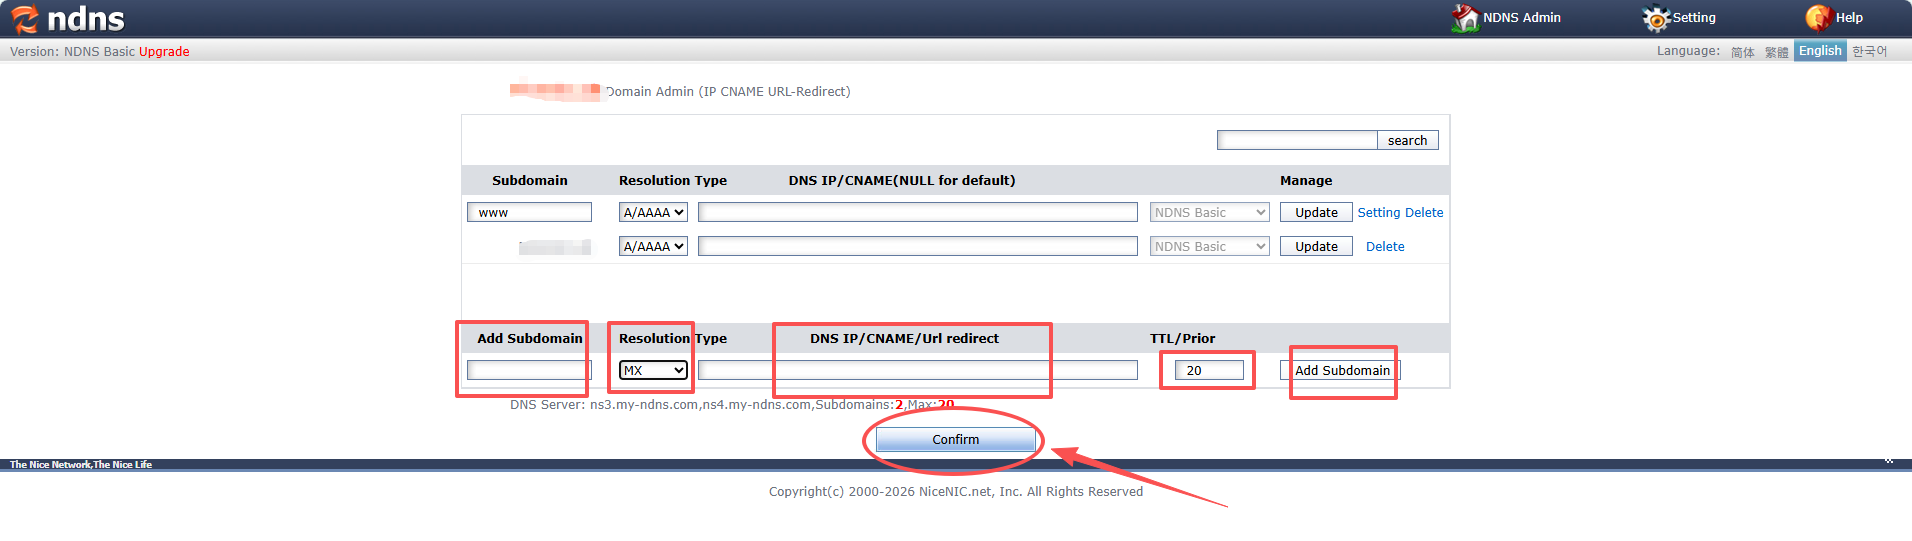
How to Add an MX Record
MX records tell other mail servers where email for your domain should be delivered.
Example:
Host: Root domain
Type: MX
Priority: 10
Value: mx.examplemail.com
If your email provider gives you more than one MX record, add each record separately.
Example:
MX 10 mx1.examplemail.com
MX 20 mx2.examplemail.com
Do not combine multiple MX targets into one record.
A lower MX priority number normally has higher delivery preference.
If you are configuring email, also check whether your provider requires SPF, DKIM, and DMARC records.
See:
How to Set Up Email DNS Records in NiceNIC: MX, SPF, DKIM, and DMARC
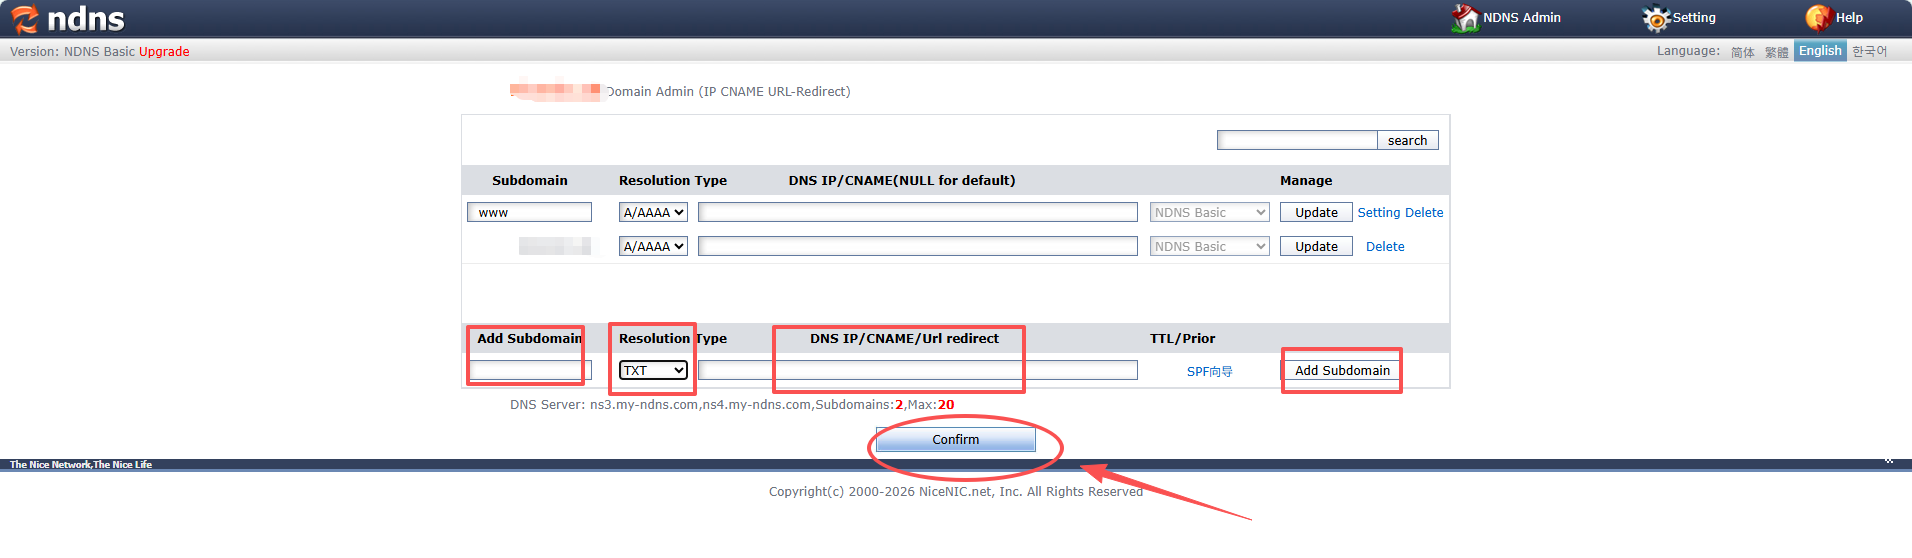
How to Add a TXT Record
TXT records are commonly used for:
- Domain ownership verification
- SPF
- DKIM
- DMARC
- Third-party service verification
Example:
Host: Root domain
Type: TXT
Value: v=spf1 include:_spf.examplemail.com ~all
Always copy the exact value supplied by the service you are configuring.
Where Do DNS Values Come From?
NiceNIC provides the DNS management interface.
The required DNS values normally come from the service you are connecting to.
For example:
- Your hosting provider supplies website A or CNAME records.
- Your email provider supplies MX, SPF, DKIM, and DMARC records.
- A verification service supplies its TXT or CNAME verification record.
Before adding a record, obtain the exact:
- Host / Name
- Record Type
- Value / Target
- Priority, if applicable
- TTL, if applicable
Do not guess third-party DNS values.
Why Is My DNS Record Not Working?
Check these common causes before contacting support.
1. The Domain Uses Different Nameservers
If the authoritative nameservers belong to another DNS provider, changes made in the NiceNIC DNS panel will not control the live DNS zone.
Make the changes at the authoritative DNS provider instead.
2. The Full Domain Was Entered in the Subdomain Field
For:
_dmarc.example.com
enter:
_dmarc
rather than the full domain.
3. The Wrong Record Type Was Selected
If your provider requests:
CNAME
use CNAME.
If it requests:
TXT
use TXT.
Do not change the record type yourself.
4. The Value or Target Is Incorrect
Copy the value exactly from the provider.
Pay particular attention to:
- Spelling
- Dots
- Underscores
- Selector names
- Mail server names
5. The MX Priority Is Incorrect
Use the exact MX priority supplied by your email provider.
6. A Wildcard Was Used Instead of a Specific Host
For example:
selector._domainkey
must be created as that specific hostname.
Do not replace it with:
*
7. DNS Has Not Propagated Yet
DNS resolvers may continue using cached records for a period of time.
After saving your changes, allow time for DNS propagation and verify the record again.
Setting Up Email DNS?
If you are configuring:
- NiceNIC Business Email
- Proton Mail
- Google Workspace
- Microsoft 365
- Zoho Mail
- Another email provider
see:
How to Set Up Email DNS Records in NiceNIC: MX, SPF, DKIM, and DMARC
That guide explains:
- MX records
- SPF records
- TXT-based DKIM
- CNAME-based DKIM
- Multiple DKIM selectors
- DMARC
- Email DNS verification
- Common configuration errors
When Should I Contact NiceNIC Support?
If the DNS record still does not work after completing the checks above, please send NiceNIC Support:
- Your domain name
- The Host / Name
- The Record Type
- The Value / Target
- The Priority, if applicable
- A screenshot of the DNS requirements supplied by your service provider
- The exact error or verification message
- The troubleshooting you have already completed
Providing these details helps us identify the issue faster.


