


How to Set Up Email DNS Records in NiceNIC: MX, SPF, DKIM, and DMARC
Quick Answer
If your domain uses NiceNIC DNS nameservers, go to:
My Account > My Products > Domain Name > Manage > DNS Records
Then add the exact records required by your email provider.
The most important rules are:
- MX records control where incoming email is delivered.
- SPF is normally published as a TXT record.
- Do not publish multiple competing SPF records for the same hostname.
- DKIM may use TXT or CNAME, depending on your email provider.
- Some email providers require two or three separate DKIM records.
-
DMARC is normally published as a TXT record under
_dmarc. -
Do not replace a required DKIM or DMARC hostname with the wildcard
*.
Before You Begin
Confirm these three things first.
1. Who Manages Your DNS?
If your domain uses NiceNIC DNS nameservers, continue with this guide.
If your domain uses third-party nameservers, add the records at that DNS provider instead.
2. Get the Exact Records From Your Email Provider
Your email provider should give you the required:
- Host / Name
- Record Type
- Value / Target
- MX Priority
- TTL, if applicable
Do not guess these values.
3. Check Existing DNS Records
Before adding new records, check whether your domain already has:
- MX records
-
An SPF TXT record beginning with
v=spf1 - DKIM records
- A DMARC record
This helps prevent duplicate or conflicting records.
How to Open the NiceNIC DNS Panel
Step 1. Log in to Your NiceNIC Account
Step 2. Open the Domain From My Products
Go to:
My Account > My Products > Domain Name
Select the domain you want to configure.
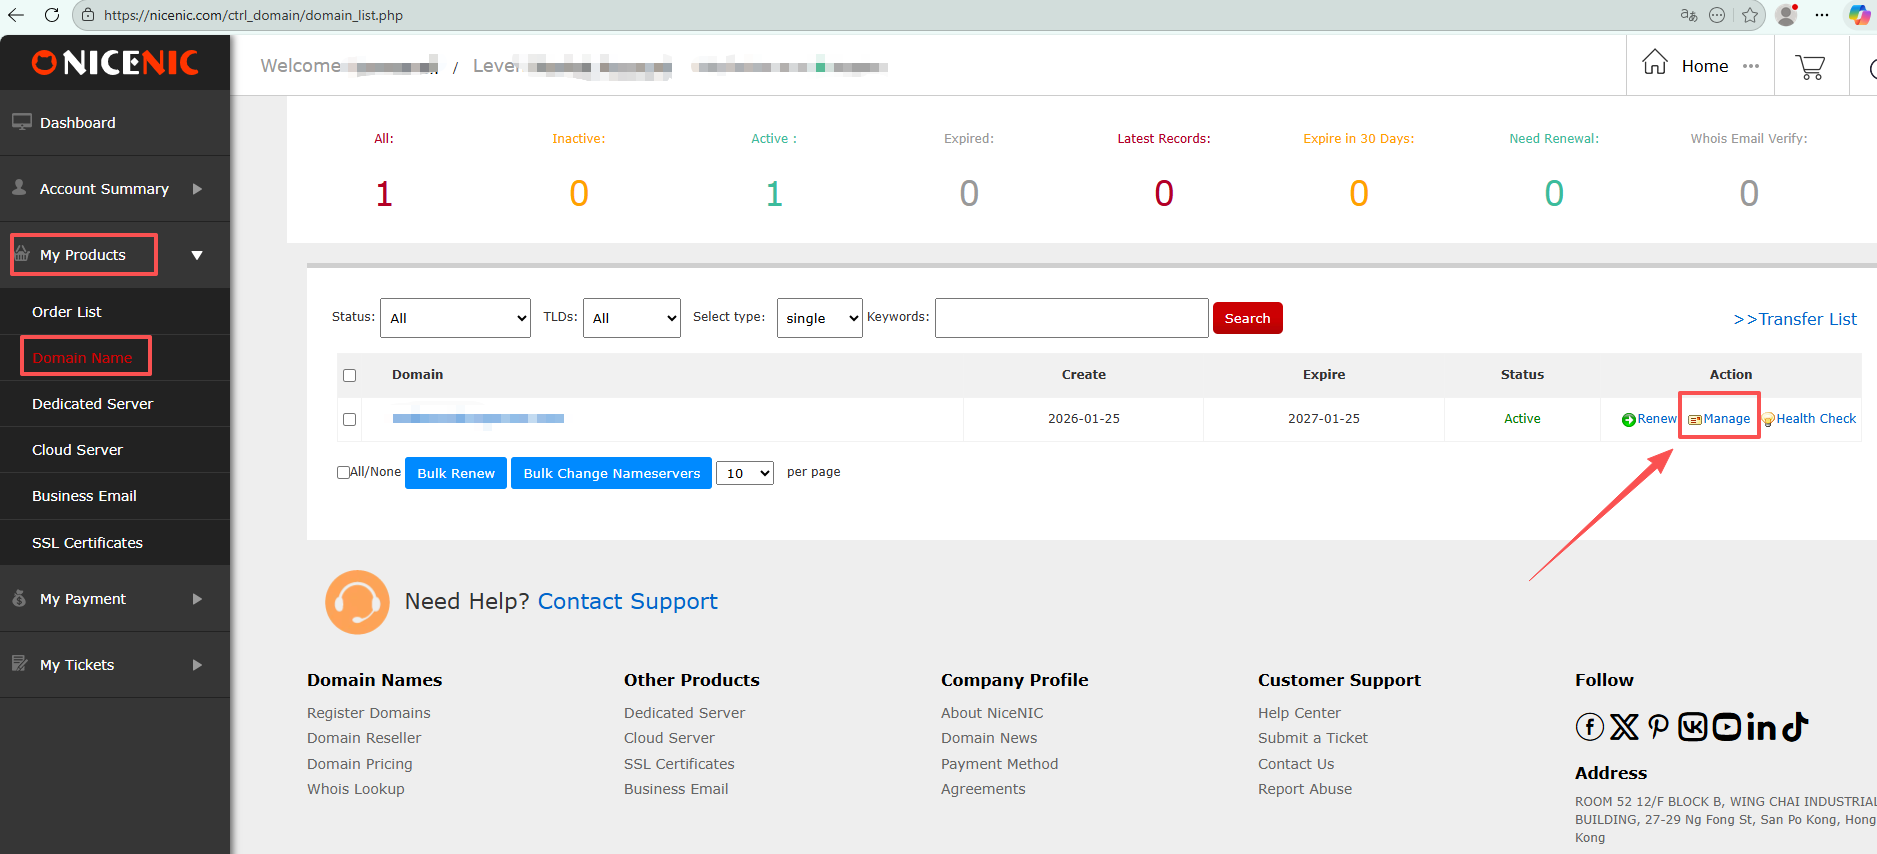
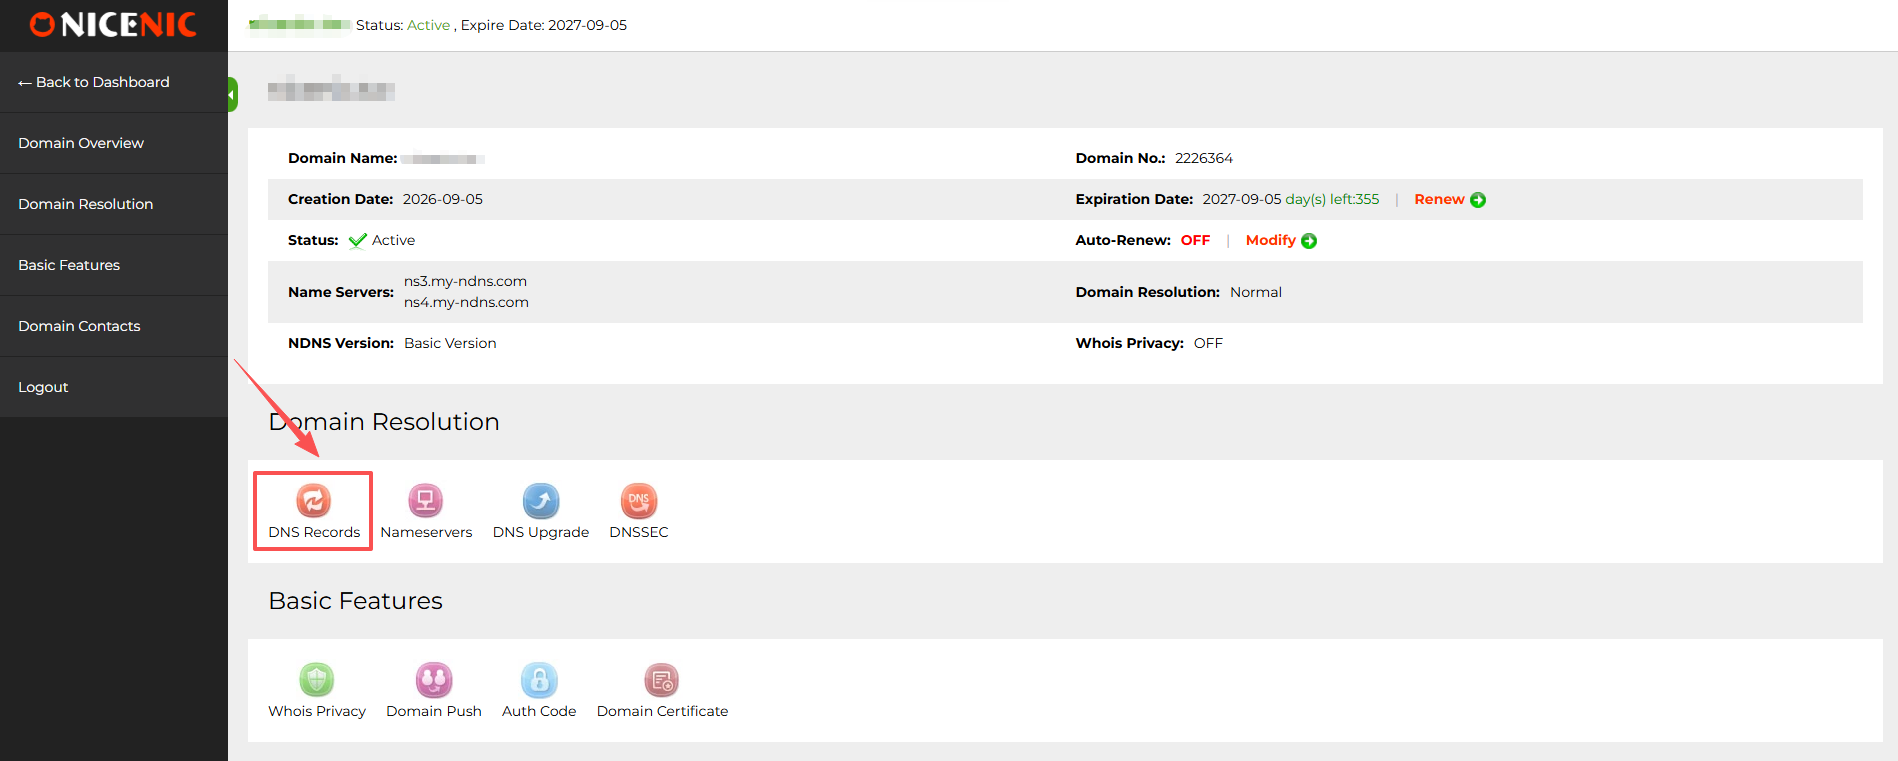
Step 3. Open DNS Records
Click:
Manage > DNS Records
Important: How to Enter Host Names in NiceNIC
If your email provider gives you the full DNS name:
_dmarc.example.com
enter only:
_dmarc
in the NiceNIC Subdomain field.
If your provider gives you:
selector1._domainkey.example.com
enter:
selector1._domainkey
If your provider shows:
@
it means the root domain.
Do not automatically enter the full domain name into a field that expects only the subdomain portion.
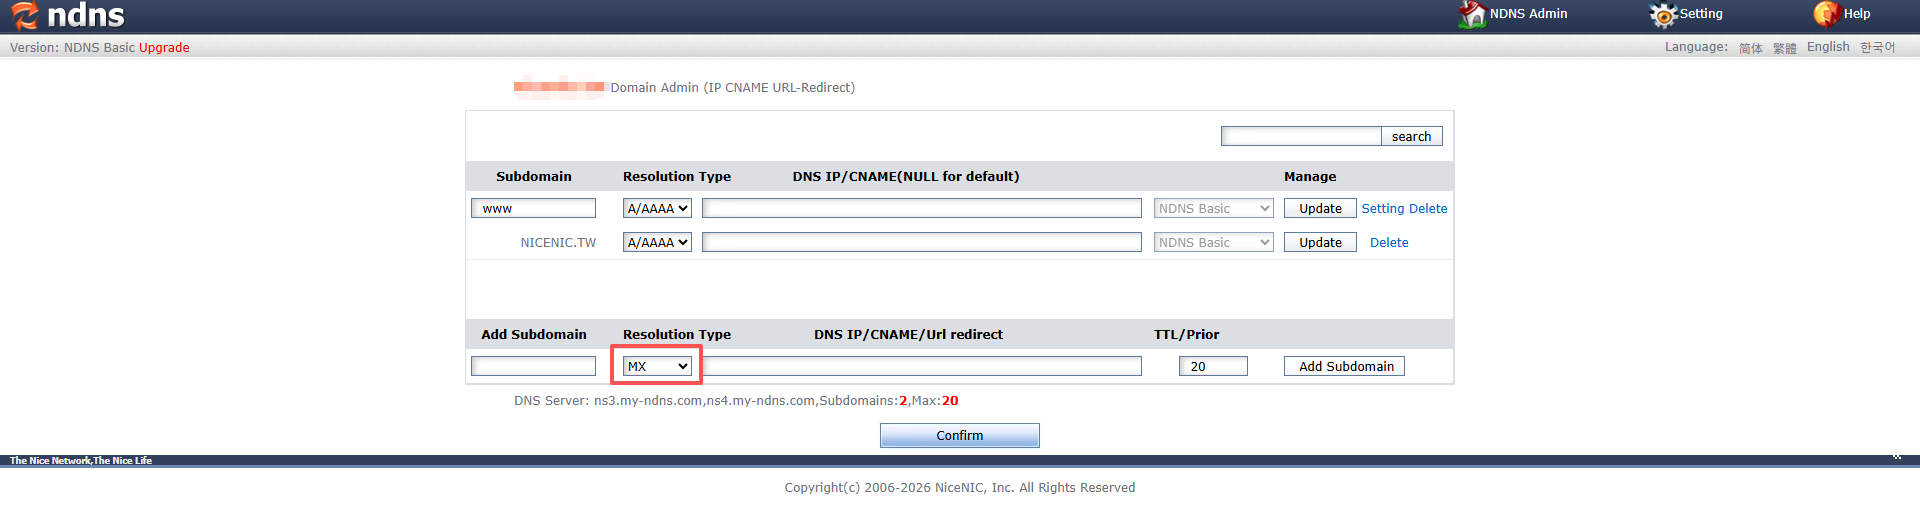
1. How to Add MX Records
MX records tell other mail servers where incoming email for your domain should be delivered.
Your email provider may give you something similar to:
Host: @
Type: MX
Priority: 10
Value: mx1.examplemail.com
and:
Host: @
Type: MX
Priority: 20
Value: mx2.examplemail.com
Add each MX record separately.
Do not combine multiple mail servers into one record.
A lower MX priority number normally has higher delivery preference.
If You Use NiceNIC Business Email
The currently used NiceNIC Business Email MX records are:
Host: Root domain
Type: MX
Priority: 5
Value: mx.c3.icoremail.net
Host: Root domain
Type: MX
Priority: 10
Value: mx2.c3.icoremail.net
The following CNAME records are also used:
mail CNAME c3.icoremail.net
imap CNAME c3.icoremail.net
pop3 CNAME c3.icoremail.net
smtp CNAME c3.icoremail.net
For more information, see:
Why Does My Email Provider Say "MX Records Inactive"?
Check the following:
- Are all required MX records present?
- Are they added to the correct root domain?
- Are the MX targets spelled correctly?
- Are the MX priorities correct?
- Are old MX records from a previous email provider still present?
- Does the domain use the same DNS nameservers where you added the records?
- Have you allowed enough time for DNS propagation?
After checking these items, return to your email provider and run its DNS verification again.
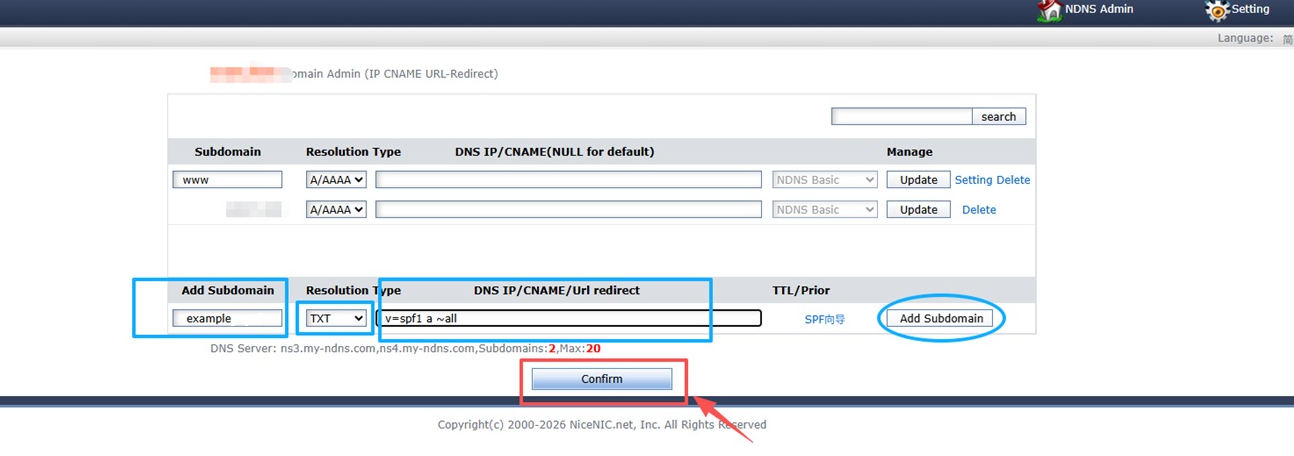
2. How to Add an SPF Record
SPF identifies which mail servers are authorized to send email on behalf of your domain.
SPF is normally published as a TXT record.
Example:
Host: @
Type: TXT
Value: v=spf1 include:_spf.examplemail.com ~all
Important: Check for an Existing SPF Record First
Before adding an SPF record, look for an existing TXT value beginning with:
v=spf1
Do not simply create a second SPF record for the same hostname.
If more than one email, CRM, newsletter, or marketing service sends mail for your domain, the required sending services normally need to be included in one valid SPF policy.
If you are unsure how to combine SPF requirements, check the instructions provided by each sending service before changing the existing record.
NiceNIC Business Email SPF
The NiceNIC Business Email SPF record is:
Host: Root domain
Type: TXT
Value: v=spf1 include:spf.icoremail.net -all
Before adding it, check whether another TXT record beginning with v=spf1 already exists.
Do not create an additional competing SPF record.
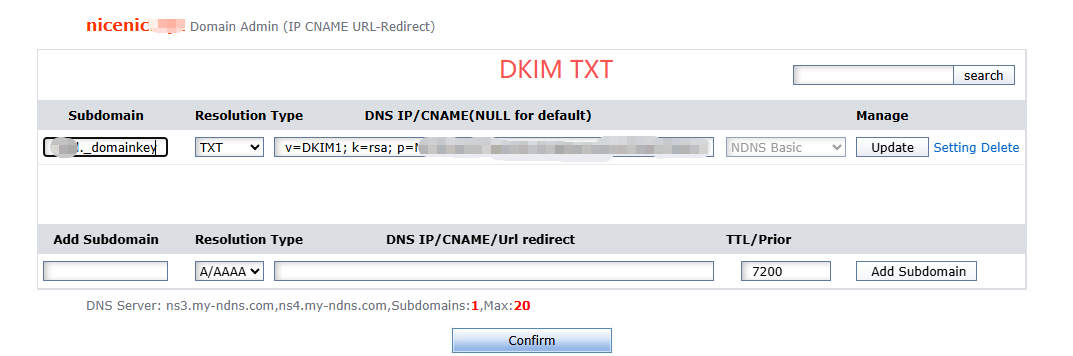
3. How to Add a DKIM Record
DKIM helps receiving mail systems verify that a message was authorized by the sending domain and that signed content was not modified after signing.
The exact DKIM DNS format depends on your email provider.
DKIM Can Be TXT
A provider may give you:
Host: selector1._domainkey
Type: TXT
Value: v=DKIM1; k=rsa; p=…
DKIM Can Also Be CNAME
Another provider may give you:
Host: selector1._domainkey
Type: CNAME
Value: selector1.provider.example
Always use the exact Type, Host, and Value supplied by your email provider.
Do not change a DKIM CNAME into TXT or a DKIM TXT record into CNAME yourself.
Where Do I Get My DKIM Value?
If you use a third-party email provider, the DKIM selector and value come from that provider.
This applies to services such as:
- Proton Mail
- Google Workspace
- Microsoft 365
- Zoho Mail
- Other hosted email platforms
NiceNIC provides the DNS management interface, but your email provider generates or supplies the domain-specific DKIM information.
Open your email provider's domain or DNS setup page and copy the exact record shown there.
If you ask NiceNIC Support to assist, please send us:
- The Host / Name
- The Record Type
- The Value / Target
- Or a screenshot of the email provider's DNS setup page
This allows us to help without asking you to repeat the same information.
What If My Email Provider Gives Me Two or Three DKIM Records?
This is normal.
Each DKIM selector is a separate DNS hostname.
For example:
selector1._domainkey
selector2._domainkey
selector3._domainkey
Add each one separately.
Do not:
- Combine them into one record
- Overwrite the first one with the second
- Place all values under one hostname
-
Replace a specific selector with the wildcard
*
Example: Proton Mail Uses Three DKIM CNAME Records
Proton Mail may provide three DKIM records similar to:
Host:
protonmail._domainkey
Type:
CNAME
Value:
protonmail.domainkey.[your-unique-value].domains.proton.ch
Host:
protonmail2._domainkey
Type:
CNAME
Value:
protonmail2.domainkey.[your-unique-value].domains.proton.ch
Host:
protonmail3._domainkey
Type:
CNAME
Value:
protonmail3.domainkey.[your-unique-value].domains.proton.ch
Each one must be added as a separate CNAME record.
Always copy the exact hostnames and values shown in your own Proton Mail account.
Do not copy another customer's DKIM value.
Important: Do Not Use Wildcard * for a DKIM Selector
If the required host is:
protonmail3._domainkey
create exactly:
protonmail3._domainkey
Do not create:
*
instead.
A wildcard DNS record does not replace a specifically required DKIM selector.
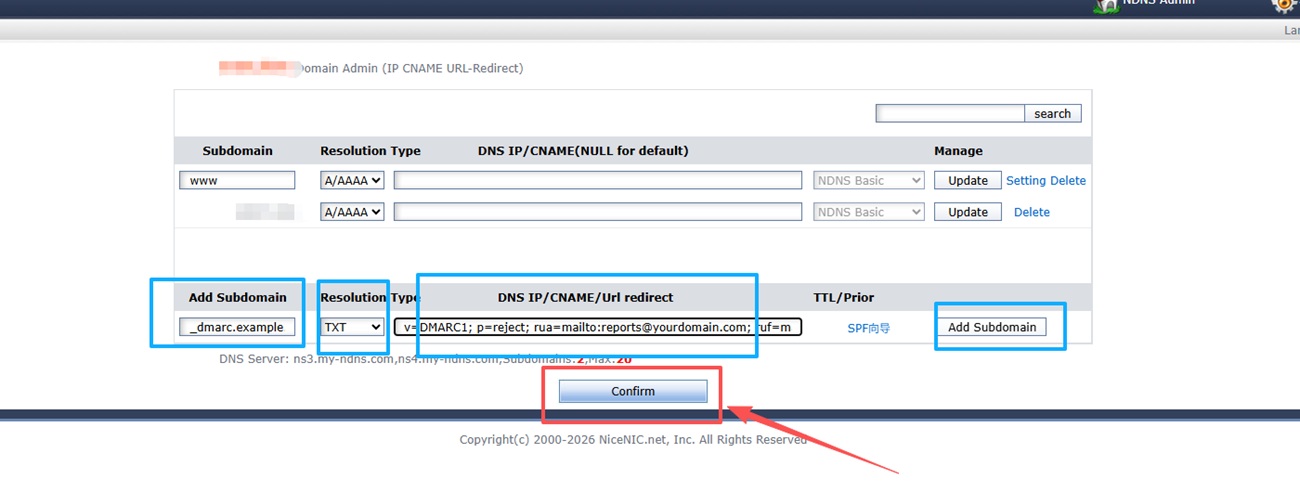
4. How to Add a DMARC Record
DMARC helps receiving mail systems apply your domain's email authentication policy and may also provide reporting information.
DMARC is normally published as a TXT record under:
_dmarc
Example:
Host: _dmarc
Type: TXT
Value: v=DMARC1; p=none
In the NiceNIC Subdomain field, enter:
_dmarc
Do not enter:
_dmarc.example.com
if the field expects only the subdomain portion.
The final DNS hostname becomes:
_dmarc.example.com
Do not place the DMARC value directly at the root domain unless your email provider specifically instructs you to do so.
Do Not Blindly Copy a DMARC Policy
A DMARC policy may contain:
p=none
p=quarantine
or:
p=reject
These policies have different effects.
Use the exact DMARC value provided by your email service or approved by your email administrator.
Do not copy a DMARC policy from this tutorial simply because it appears as an example.
Complete Example: What a Proton Mail DNS Setup May Look Like
A completed Proton Mail setup may look approximately like this:
@ TXT protonmail-verification=…
@ TXT v=spf1 include:_spf.protonmail.ch ~all
protonmail._domainkey CNAME protonmail.domainkey.[unique-value].domains.proton.ch
protonmail2._domainkey CNAME protonmail2.domainkey.[unique-value].domains.proton.ch
protonmail3._domainkey CNAME protonmail3.domainkey.[unique-value].domains.proton.ch
_dmarc TXT [use the exact DMARC value shown by Proton Mail]
@ MX 10 mail.protonmail.ch
@ MX 20 mailsec.protonmail.ch
The [unique-value] text above is only a placeholder.
Copy the exact DKIM and DMARC values shown in your own Proton Mail account.
The most important point is that the following three DKIM selectors are three separate DNS records:
protonmail._domainkey
protonmail2._domainkey
protonmail3._domainkey
Do not combine them and do not replace any of them with *.
5. Save and Verify the DNS Records
After adding the required records:
- Save the DNS changes.
- Allow time for DNS propagation.
- Return to your email provider's domain setup page.
- Run DNS verification again.
- Check whether MX, SPF, DKIM, and DMARC now show as verified.
Saving a DNS record does not necessarily mean that every DNS resolver or your email provider can see it immediately.
DNS caching may delay verification.
Common Email DNS Problems
"I Have Three DKIM Addresses, but I Can Only Configure One."
Create each DKIM selector as a separate record.
For example:
protonmail._domainkey
protonmail2._domainkey
protonmail3._domainkey
These are three different hostnames and can coexist.
Do not use one hostname for all three values.
Do not replace the third selector with *.
"My MX Records Are Inactive."
Check:
- The authoritative nameservers
- The MX host
- The MX target
- The MX priority
- Duplicate or old MX records
- DNS propagation
Then run your email provider's verification again.
"My DKIM Record Cannot Be Detected."
Check:
- Whether the DKIM selector is correct
- Whether your provider requested TXT or CNAME
- Whether the target or value is exact
- Whether you entered the full domain when only the subdomain was required
-
Whether you accidentally used
* - Whether the DNS change has propagated
"My DMARC Record Cannot Be Detected."
Confirm that the Host is:
_dmarc
and that the record type is:
TXT
Do not publish the DMARC value at the root domain unless your provider specifically tells you to do so.
"I Already Have an SPF Record."
Do not create another separate v=spf1 record for the same hostname.
Review the existing SPF record and the new service's requirements before making changes.
If multiple services send email for your domain, their required SPF mechanisms normally need to be incorporated into one valid SPF policy.
"Where Do I Get the DKIM or DMARC Values?"
Get them from your email provider's domain configuration page or from your email administrator.
If you want NiceNIC Support to help, send us:
- Host / Name
- Type
- Value / Target
- Priority, if applicable
- A screenshot from the email provider
When Should I Contact NiceNIC Support?
Most email DNS setup issues can be resolved using the steps above.
If verification still fails, please send us:
- Your domain name
- Your email provider
- The required Host / Type / Value / Priority
- A screenshot of the provider's DNS instructions
- The exact error or verification message
- The troubleshooting you have already completed
This allows us to check the problem faster without repeating basic questions.


