


How to Find and Add DKIM Records for NiceNIC Business Email
If your domain name and Business Email are both with NiceNIC, you can find your DKIM record directly in the NiceNIC Webmail administration panel.
This guide shows you how to find your DKIM settings, copy the correct DNS records, and verify and enable DKIM/DMARC for your email domain.
DKIM (DomainKeys Identified Mail) helps receiving email servers verify that your messages were signed by an authorized mail system and have not been altered in transit.
Step 1. Open the DKIM/DMARC Settings
- Visit NiceNIC Webmail.
- Log in with your Business Email administrator account.
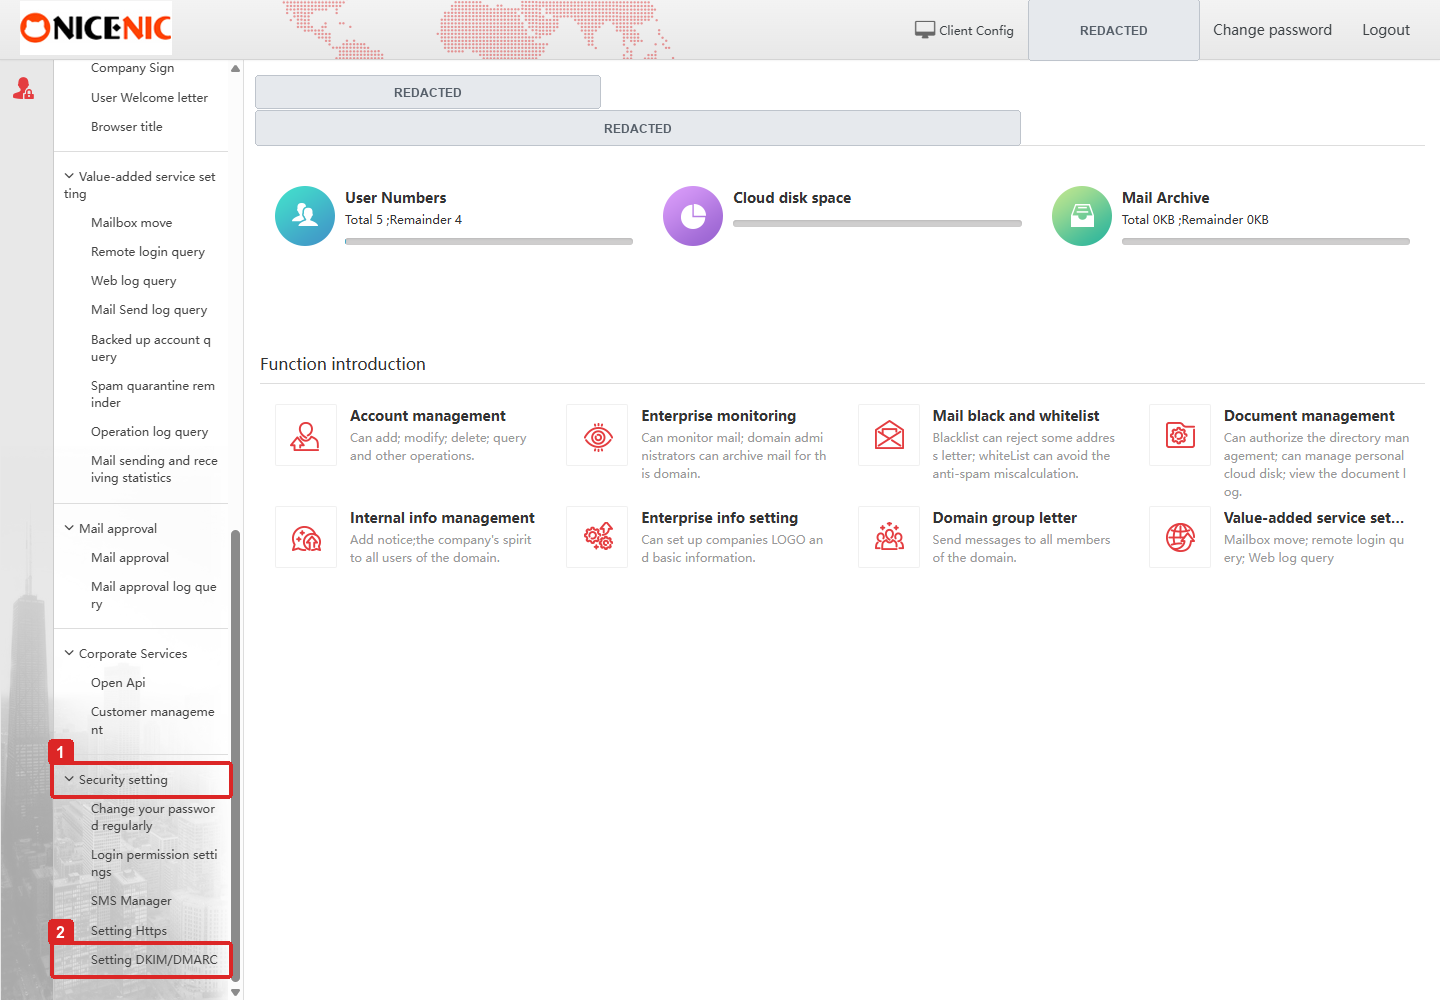
- In the left-hand menu, expand Security setting.
- Click Setting DKIM/DMARC.
You will now see the DKIM/DMARC management page for your email domain.
Note: Make sure you are using the administrator account, not a regular mailbox account.
If you need to find your administrator login information, log in to your NiceNIC account and go to My Products > Business Email > Manage.
Step 2. Find Your Domain and DKIM Configuration
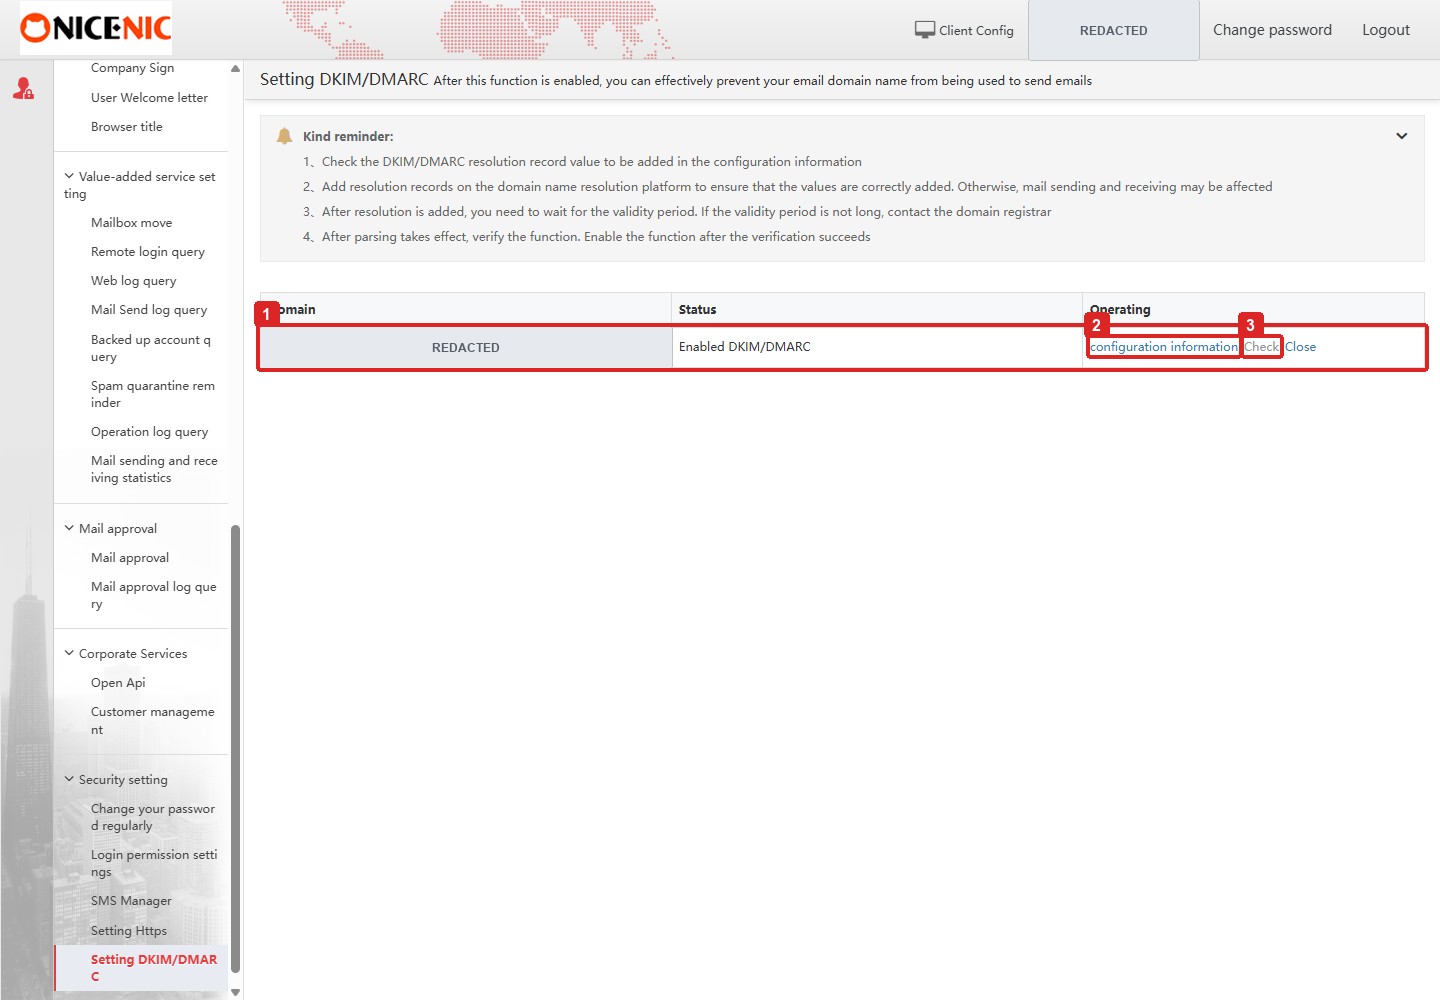
On the Setting DKIM/DMARC page, find your email domain in the list.
The page displays three columns:
- Domain: Your email domain name.
- Status: Whether DKIM/DMARC is currently enabled.
- Operating: Options including configuration information and Check.
Click configuration information next to your domain to view the required DNS records.
If the status already shows Enabled DKIM/DMARC, the feature has already been enabled. You can still review its DNS configuration.
Step 3. Copy and Add Your DKIM DNS Records
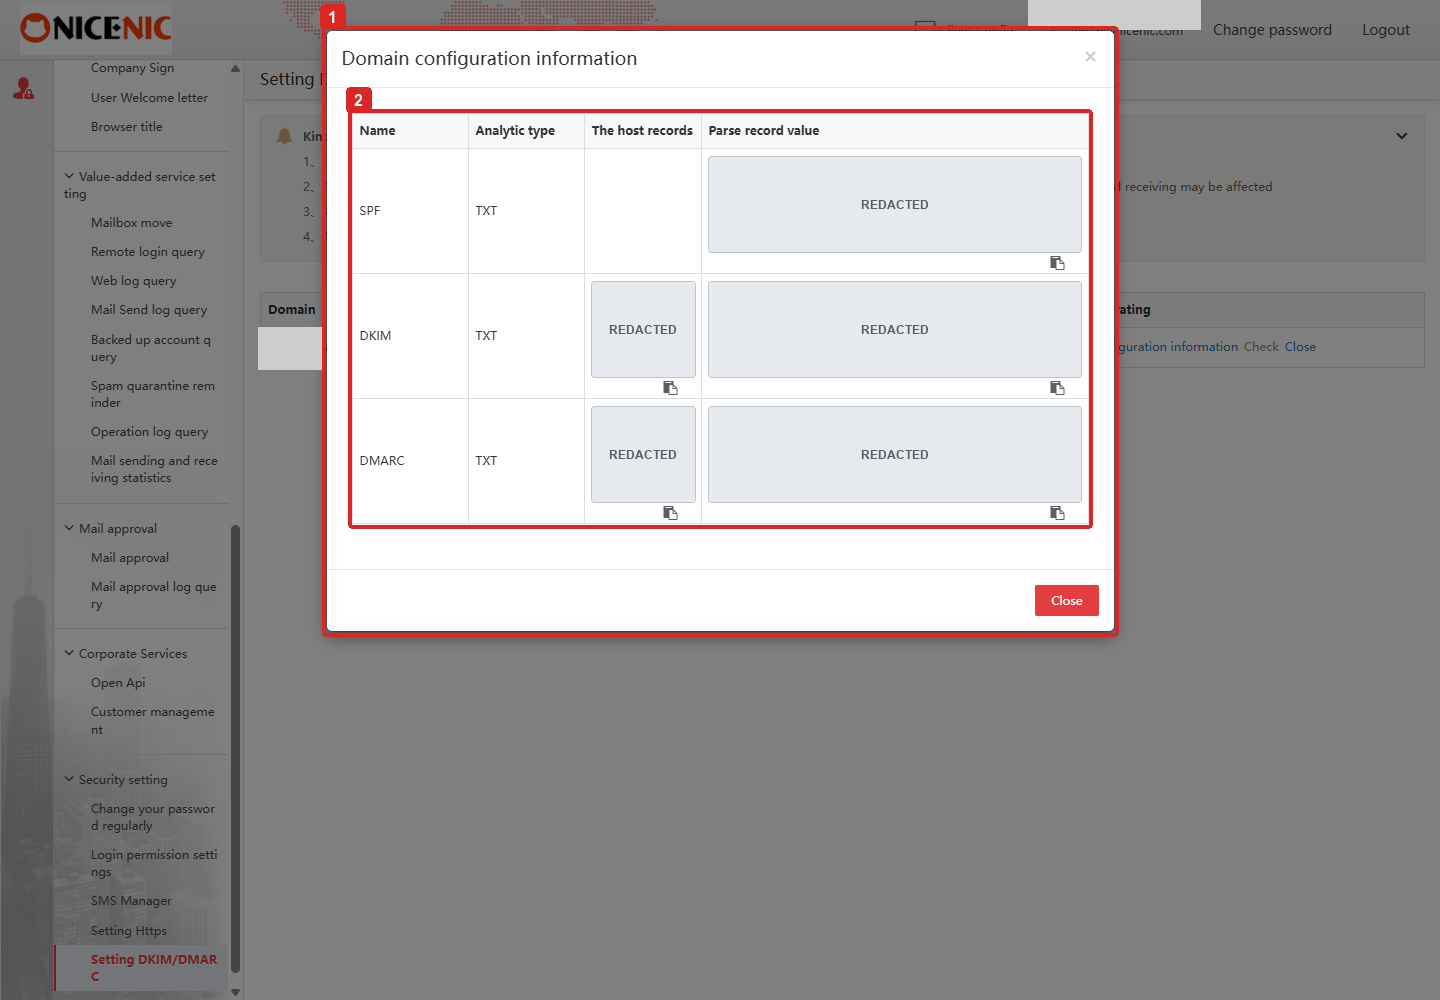
A window titled Domain configuration information will appear.
It displays the DNS records for your email domain:
For each record, check the following fields:
- The host records: The hostname where the DNS record should be added.
- Parse record value: The DNS value that needs to be published.
Click the copy icon beneath the relevant field to copy its exact content.
Add the records to NiceNIC DNS
If your domain uses NiceNIC DNS:
- Log in to your NiceNIC account.
- Go to My Products > Domain Name.
- Select your domain and click Manage > DNS Records.
- Check for existing SPF, DKIM, and DMARC records.
- Add any missing records using the hostname, record type, and value provided by NiceNIC Webmail.
- Save your changes.
Important when entering the hostname:
If the full DKIM hostname is shown as selector._domainkey.example.com, enter selector._domainkey in the NiceNIC Subdomain field.
Use the actual selector displayed in your Webmail configuration. Do not copy the example above.
For root-domain records, use @ or leave the hostname field empty, as appropriate.
Do not replace existing records without checking them first. In particular, publishing multiple SPF policies for the same hostname can cause SPF authentication errors. Existing DMARC policies may also need to be preserved.
If your domain uses Cloudflare or another DNS provider, add the records there instead of NiceNIC.
Step 4. Check and Enable DKIM/DMARC
After adding the required DNS records:
- Return to NiceNIC Webmail.
- Open Security setting > Setting DKIM/DMARC.
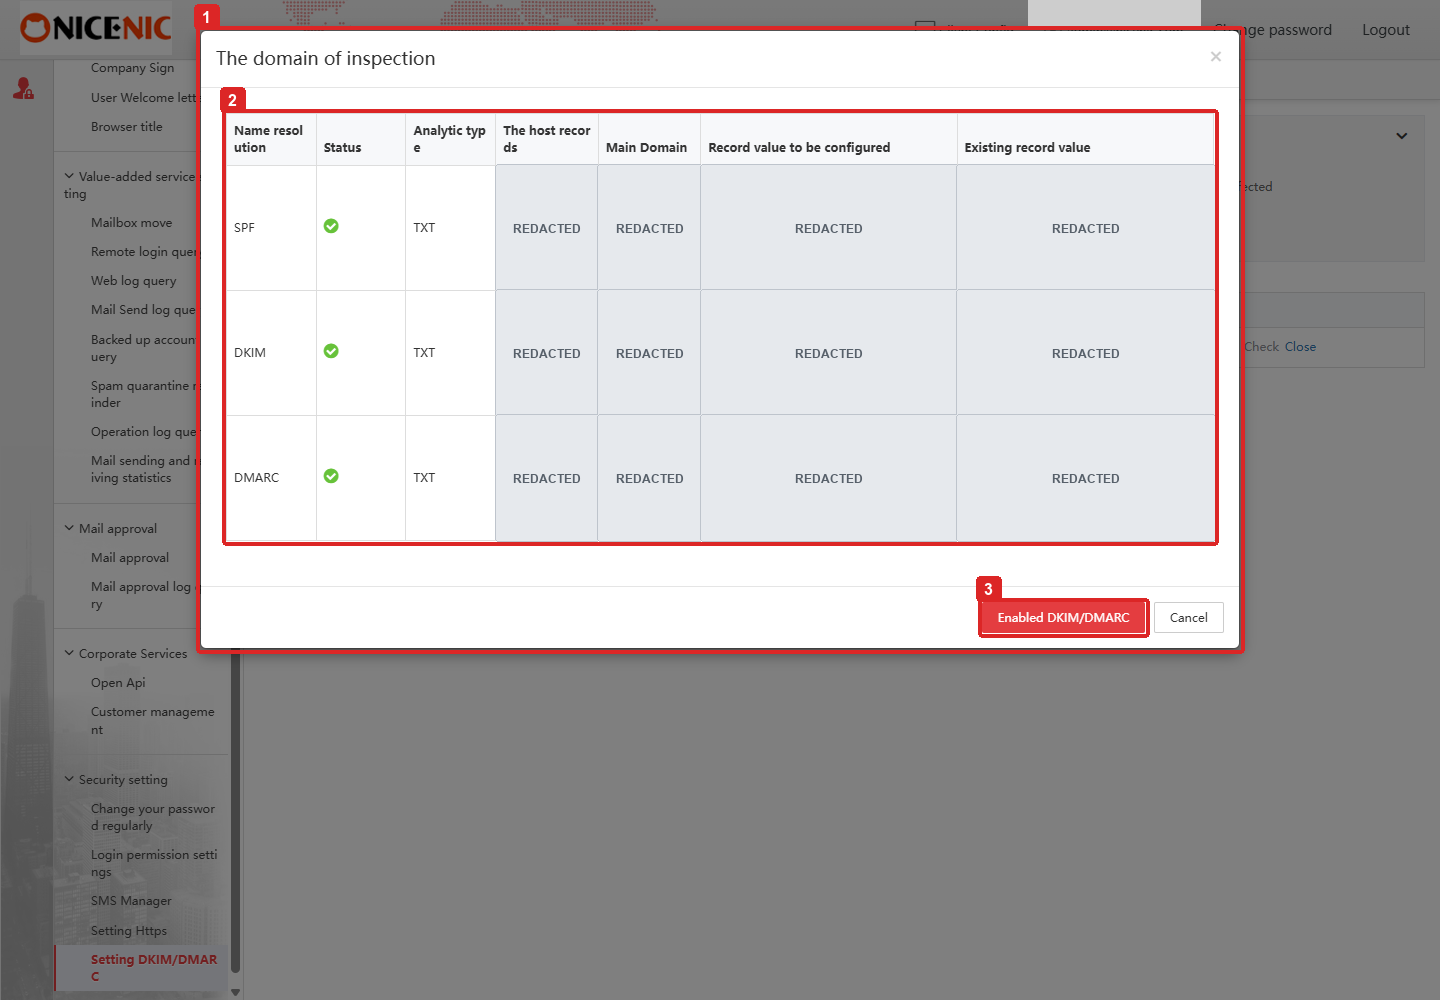
- Find your domain and click Check.
- A window titled The domain of inspection will appear.
- Review the verification results for SPF, DKIM, and DMARC.
A green check mark next to each record indicates that the corresponding DNS check has passed.
If all required checks pass and DKIM/DMARC is not yet enabled, click Enabled DKIM/DMARC to activate the function.
Return to the main settings page and confirm that your domain shows Enabled DKIM/DMARC.
If your domain already has this status, you do not need to enable it again.
If a record fails verification, check its hostname, record type, and value. DNS changes can take time to become visible, so you may need to wait before checking again.
How Can I Confirm DKIM Is Working?
After the feature is enabled, you can send a test email from your NiceNIC Business Email address to Gmail.
Open the received message, click the three-dot menu, and select Show original.
Look for DKIM: PASS and check the signing domain.
This provides an additional check that your outgoing email is actually being signed and authenticated, beyond simply having the DNS records in place.
Common Questions
Where can I find my NiceNIC Business Email DKIM record?
Log in to NiceNIC Webmail as an administrator, then open Security setting > Setting DKIM/DMARC > configuration information.
The DKIM row displays the record type, hostname, and value to configure in DNS.
Do I need to generate my own DKIM key?
No. Use the DKIM DNS information provided by the NiceNIC Webmail administration panel. You do not need to generate a separate DKIM key for this setup.
Why does DKIM verification fail?
Common causes include an incorrect hostname, an incomplete TXT value, changes made at the wrong DNS provider, or DNS changes that have not yet propagated.
Do I need to configure SPF and DMARC too?
The NiceNIC Webmail configuration window displays SPF, DKIM, and DMARC together, and the Check function verifies all three.
Review each record and make sure the required configuration is published correctly, without replacing existing policies unnecessarily.
How to Add Other Email DNS Records
Need to add other email DNS records, such as MX, SPF, or DMARC?
Follow our How to Set Up Email DNS Records in NiceNIC: MX, SPF, DKIM, and DMARC guide for step-by-step instructions on adding and managing these records in your NiceNIC DNS settings.
Need Help?
If you cannot find your DKIM settings or the DNS verification continues to fail, please contact NiceNIC Support.
Include your domain name and a screenshot of the verification results so our support team can help identify the problem.
Never include your email administrator password or DKIM private key.


